| Title | Image | Page Summary: |
|---|---|---|
| Mancy - Without a Teacher | ||
| Mancy - Without - Page 1 |
|
The text is a title page indicating the focus on drawing from nature and learning to draw independently, without a teacher. |
| Mancy - Without - Page 2 |
|
This page indicates the printing information for the book, noting that it was printed by Paul Renouard at Rue Garancière, No. 5. |
| Mancy - Without - Page 3 |
|
The text is an introduction to a book titled "Drawing from Nature and Without a Teacher," authored by Adèle V. Le Breton. It describes a method for drawing from nature starting from the very first lesson. The book was published in Paris in 1830, and the author was a student of her father, dedicated to her artistic pursuit. |
| Mancy - Without - Page 4 |
|
The text discusses the importance of properly defining drawing before teaching it, as failing to do so results in ineffective instructional methods. Drawing is described as the representation of an object in such a way that it appears real. The text categorizes Drawing, Painting, and Sculpture as branches of the Arts of Drawing that share a common foundation in understanding perspective. |
| Mancy - Without - Page 5 |
|
Drawing is vital to arts like architecture, acting as a basis for painting and sculpture. True drawing is defined as the ability to accurately recreate seen objects with correct proportions and expressions. It is argued that true drawing, especially from nature, should be an essential element of education and societal contribution. |
| Mancy - Without - Page 6 |
|
The text emphasizes the importance of drawing from nature, rather than copying drawings, as a fundamental educational method. Drawing is presented as a complement to language, especially beneficial for developing intellectual understanding. The author proposes that teaching this method from the first lesson can refine observation and understanding skills, distinguishing their teaching from traditional practices. |
| Mancy - Without - Page 7 |
|
The text introduces the principles of drawing from nature, emphasizing the importance of understanding geometry, architecture, and optics. It presents a method for learning to draw without a teacher, focusing on fundamental skills and encouraging observation from life. The text discourages direct copying of illustrations, suggesting they are guides to support hands-on practice with real objects. |
| Mancy - Without - Page 8 |

|
The text is an introduction to basic geometry concepts essential for drawing from nature, focusing on fundamental definitions such as points, lines, angles, and surfaces. It explains simple geometric constructions and distinctions between different types of lines and angles. The text serves to bridge standard geometric understanding with practical applications for those learning to draw from nature. |
| Mancy - Without - Page 9 |
|
The text describes geometric concepts, including identifying a flat plane and defining parallel, horizontal, and vertical lines. It explains rectilinear figures, such as triangles and quadrilaterals, and illustrates terms related to circles, including diameter, radius, circumference, arc, tangent, and points of contact. These explanations help in understanding basic geometric principles in drawing and art. |
| Mancy - Without - Page 10 |
|
The text provides methods for basic geometric constructions, such as finding parallel and perpendicular lines, dividing lines into equal parts, finding the center of a square, and constructing circles through given points. Instructions include using arcs and lines to achieve these constructions. Additionally, it describes how to draw an oval using a compass. |
| Mancy - Without - Page 11 |
|
The text provides instructions on dividing a circle into equal parts and drawing geometric shapes like squares, triangles, hexagons, and pentagons within a circle. It explains the method for inscribing these shapes and includes a section on basic architectural concepts for drawing arches and vaults. Techniques include the use of diameters, radii, and arcs to complete these geometric constructions. |
| Mancy - Without - Page 12 |

|
The page provides instructions for drawing different types of arches and their formations, including regular, lower, elongated, and basket-handle arches, using points and radii as guides. It also includes a brief demonstration of vision, describing the eye as an optical machine that collects light to strike the retina, likened to a camera obscura. |
| Mancy - Without - Page 13 |
|
The text explains the anatomy of the eye, specifically the roles of the iris, pupil, crystalline lens, and retina in processing light and forming images. It describes how the eye adjusts to light and translates the external view into an image that ultimately gets interpreted by the brain. Additionally, it provides practical advice for drawing from life, emphasizing the need to use one eye to avoid optical conflicts. |
| Mancy - Without - Page 14 |

|
The text discusses the fundamental role of perspective in drawing from nature, emphasizing the importance of learning to see accurately. It uses the example of a square box to illustrate how our eyes perceive objects differently from their actual shape, underscoring the necessity of understanding perspective. The text suggests exercises and methods for accurately capturing what is seen, rather than what is assumed, which is crucial for drawing accurately from nature. |
| Mancy - Without - Page 15 |
|
Drawing effectively relies on training the eye to see real proportions and perspectives, rather than assumptions. Students are first trained in drawing from nature, and then from well-executed drawings to aid in understanding techniques and tools. This approach ensures students develop well-rounded skills in different artistic styles, as supported by a general method. |
| Mancy - Without - Page 16 |
|
The text explains the significance of comparing the dimensions of objects when drawing from life. It describes a simple method to perform these comparisons using a pencil holder to measure and align the dimensions, such as height and width, visually. This method aids in understanding the proportions of an object better, necessary for accurate drawing. |
| Mancy - Without - Page 17 |
|
The text discusses the application of a previous demonstration regarding measuring proportions using a pencil holder as a tool. It explains how an observer can compare the height of a column's base to its total height through visual alignment and incremental measurement. The explanation details that the base height is one-third of the total height. |
| Mancy - Without - Page 18 |
|
This text discusses techniques for accurately measuring and comparing dimensions when drawing from nature. It emphasizes maintaining a consistent distance between the hand and the eye during measurements. Methods are described for using tools like paper strips and rulers to measure proportions and dimensions accurately. |
| Mancy - Without - Page 19 |
|
The text explains the concepts of Geometrical Plane and Perspective Plane. A geometrical plane is seen in its true form without distortion, while a perspective plane appears with foreshortening or distortion based on its orientation to the observer. The explanation includes instructions on how to visualize and experiment with these concepts using simple materials like a square of cardboard. |
| Mancy - Without - Page 20 |
|
The text discusses perspective in drawing and how an observer’s eye level affects the perception of foreshortening in visual representations. It provides an experimental illustration using cardboard and threads to help understand changes in perspective as the viewing angle changes. The summary reiterates the importance of drawing what one actually sees rather than what one thinks they see, emphasizing the education of the eye in drawing from life. |
| Mancy - Without - Page 21 |
|
The text outlines a series of drawing lessons, divided into three main parts: drawing general body shapes, drawing the head, and drawing the entire body or academies from nature. The first part is further divided into five chapters, covering rectangular objects, circular shapes, combination shapes, interiors, and landscapes. The fundamental aspects of linear perspective are emphasized as part of these lessons. |
| Mancy - Without - Page 22 |
|
The text advises on how to draw rectangular objects, specifically using a box as a simple model. It discusses the optimal positioning of the artist relative to the object, suggesting a distance of two or three times the object's greatest dimension for a better perspective. The text also explains the concept of geometric and perspective planes and the importance of setting proportions when sketching from nature. |
| Mancy - Without - Page 23 |
|
The text explains a method for representing three-dimensional objects on a two-dimensional plane by using a pencil or similar tool to measure proportions visually. It guides the reader through steps to understand and replicate the dimensions of a box face using geometrical comparison techniques. The importance of comparing depths and sizes for accurate representation in perspective is emphasized. |
| Mancy - Without - Page 24 |
|
The text discusses techniques for drawing boxes in perspective, starting with finding specific points and angles, and using them to form geometric shapes. It suggests using plumb lines and pencil holders as tools for visual accuracy. Additionally, it provides steps on how to perceive the elevations and distances between different parts of a box when drawing from nature. |
| Mancy - Without - Page 25 |
|
The text explains the steps for drawing a box with perspective, including measuring distances using a drawing tool. Instructions are given to compare angles and lines with guide threads or pencil holders. It provides detailed methodology for achieving accurate perspective based on a given model. |
| Mancy - Without - Page 26 |
|
The text describes a method for drawing a rectangular box using linear perspective techniques. It explains how to find specific points and planes on a drawing to represent different sides of the box. The document concludes by emphasizing the importance of these techniques for drawing not only rectangular but also spherical objects from nature. |
| Mancy - Without - Page 27 |
|
The text discusses the importance of perspective as the foundation of drawing from nature, emphasizing concepts such as vanishing lines and the point of view. It explains how these lines appear to converge at a 'point of view' on the horizon line, which is essential in creating realistic drawings. The text also highlights that understanding these concepts is crucial for beginners to avoid intimidation. |
| Mancy - Without - Page 28 |
|
The text describes how perspective in drawing makes parallel lines appear to converge at a single point, known as the 'Point of Convergence.' An experiment involving tracing on glass demonstrates this effect. Additionally, the text discusses 'accidental points' in perspective, where lines from non-parallel object faces converge at two distinct points. |
| Mancy - Without - Page 29 |
|
The text explains the concept of "Accidental Points" in perspective drawing. These points occur when objects are positioned in unusual or varying angles relative to the horizon line, affecting how imaginary lines converge. It describes how different orientations of straight-lined figures influence the location of these accidental convergence points. |
| Mancy - Without - Page 30 |
|
This chapter discusses how circles appear as ellipses when viewed from different planes using perspective. It explores how varying the observer's position above a circle influences the degree of foreshortening and changes its appearance from a circle to an ellipse. Practical demonstrations illustrate these changes in perspective, emphasizing the difference in diameters as perceived by an observer. |
| Mancy - Without - Page 31 |
|
The text discusses the perspective view of circles placed at different heights relative to the observer's eye. It suggests a simple experiment using threads to demonstrate changes in perspective. Instructions are also provided for drawing a circle in perspective using a geometric and perspective plan. These instructions describe how to visually translate a geometrical circle into a perspective drawing. |
| Mancy - Without - Page 32 |
|
The text from page 29 provides instructions on drawing circles and ellipses in perspective, explaining the geometric transformations involved when an object is viewed at an angle. It outlines the method of applying these techniques to drawing a drinking glass by accurately representing its circular top as an ellipse. The instructions emphasize understanding and employing perspective principles to achieve realistic representations. |
| Mancy - Without - Page 33 |
|
This passage discusses the detailed process of drawing an ellipse and its components by creating comparative measurements. The instructions guide the reader on using a pencil holder to measure diameters and angles, ensuring precise measurements through a method of divisions and foreshortening. Additionally, it describes the need for adjustments in drawing the base of a transparent glass to achieve accurate dimensional appearances. |
| Mancy - Without - Page 34 |
|
The text provides a step-by-step method for drawing a wine glass from nature, detailing how to set the glass's height and diameter on a vertical line, comparing various parts to determine proportions. It emphasizes comparing smaller parts of the glass with larger known dimensions to accurately sketch different sections, such as the glass and its stem, by using ratios and repeating these measurements across the drawing. The approach ensures precision by minimizing unnecessary hand movement and stresses the importance of comparing each dimension with the nearest known dimension. |
| Mancy - Without - Page 35 |
|
The document provides instructions on drawing a glass from different perspectives, focusing on comparing dimensions to ensure accuracy. It explains how to visualize the elliptical shapes created by liquid in a glass and the importance of holding tools correctly to make these comparisons. Techniques involve ensuring alignment of lines and understanding the observer's viewpoint to render shapes accurately. |
| Mancy - Without - Page 36 |
|
The text provides instructions on how to draw objects from nature, focusing on geometric shapes such as ellipses and their perspective. It discusses how to determine the curvature and dimensions of a bottle and explains how this technique applies to other round objects like wells and towers. The approach involves comparing dimensions and utilizing perspective to achieve symmetry and proportion. |
| Mancy - Without - Page 37 |
|
This page provides instructions on drawing various structures using ellipses and perspectives, such as wells, towers, and barrels, emphasizing the importance of proportion and point of view. It explains how to depict stones in the well’s walls by using half-ellipses parallel to a main ellipse and discusses foreshortening techniques. Additionally, the text guides viewers on how to draw fountains, tree trunks, and church elements like porches and steeples from life, using previously described methods. |
| Mancy - Without - Page 38 |

|
Chapter III discusses combining rectangular and round forms found in nature and applying them to drawing objects like stools and chairs. It explains drawing a stool by first understanding how to draw a box, then applies similar geometric and perspective principles to the stool's structure. The chapter emphasizes utilizing geometric and perspective plans to accurately depict shapes and dimensions. |
| Mancy - Without - Page 39 |
|
The text describes how to draw various furniture pieces and a house by observing natural forms and considering different perspectives. It explains drawing techniques for stools, chairs, and tables, highlighting the relationships between geometric shapes and real-world objects. For a house, it suggests seeing the house as a large box and addressing finer details later, emphasizing proportion and perspective. |
| Mancy - Without - Page 40 |
|
This text discusses principles of perspective drawing, focusing on how to calculate the height and proportions of a house and its roof. It explains the process of drawing by comparing various elements like windows, doors, and chimneys using geometrical and perspective plans. The methods employ direct comparison and proportional scaling for accurate depiction in drawings. |
| Mancy - Without - Page 41 |
|
The text describes techniques for drawing in perspective, specifically for illustrating objects like windows, trees, and columns, and how they appear to diminish in size as distance from the observer increases. It explains how to accurately plot these objects using points, lines, and intersections to replicate real-life diminishment. The instructions can be applied to various objects, demonstrating the principles of perspective in art and geometry. |
| Mancy - Without - Page 42 |
|
This text provides instructions for drawing a house from a higher viewpoint, with the observer positioned above the house. It emphasizes using geometric and perspective techniques to accurately depict vanishing lines and proportions. The passage discusses comparing various features like roof height and staircase dimension for precise scale and perspective drawing. |
| Mancy - Without - Page 43 |
|
The text defines a "tableau" or picture in two contexts: the objects seen by the observer and the representation of these objects in art. It explains how to draw the interior of a room from nature, emphasizing maintaining a fixed viewpoint. The text stresses understanding perspective to correctly depict spaces and objects within a frame. |
| Mancy - Without - Page 44 |

|
The text describes a method for drawing a room as if seen through a transparent glass partition. It outlines a step-by-step guide to accurately determine room dimensions on paper using lines and perspectives, noting proportional relationships and the use of a horizontal pencil for measurements. The drawing starts by defining the main structure before focusing on details, such as windows, ensuring all lines converge at a common viewpoint. |
| Mancy - Without - Page 45 |
|
This text explains how to draw perspectives by using windows and their dimensions as reference points. It details the process of comparing widths and heights of windows within a room, establishing a central vertical reference line, and using a perspective line to determine alignments. The concept includes using grids for accurate drawing proportions. |
| Mancy - Without - Page 46 |

|
The text provides detailed instructions on drawing techniques, particularly focusing on using perspective to proportion objects accurately. It describes methods to determine views and drawing intersecting lines to create windows, furniture, and paintings. The described method emphasizes the use of a vanishing point and receding lines for precise rendering in perspective drawing. |
| Mancy - Without - Page 47 |
|
The text explains how to use visual comparisons to draw various elements within a room, focusing on paintings, the fireplace, and the carpet using principles of perspective. It details how to measure and compare dimensions for these components to keep consistency and perspective. Techniques include checking alignments with vertical and horizontal lines and drawing ellipses and circles in perspective. |
| Mancy - Without - Page 48 |
|
The text describes the process of drawing stairs as observed from different perspectives, focusing on ascending and descending staircases. It gives specific instructions on how to measure and interpret the dimensions and angles of the stairs using a pencil as a tool for comparison. The goal is to accurately convey the visuals and perspectives of staircases in a drawing. |
| Mancy - Without - Page 49 |
|
The passage describes how to draw a descending staircase from nature, focusing on how objects appear according to perspective rather than their actual form. It explains that even though a staircase descends, its steps appear at varying heights depending on the viewer's perspective. There's also mention of using prepared glass for tracing to confirm this perspective. |
| Mancy - Without - Page 50 |
|
The text explains a method for drawing stairs from nature, detailing how to measure and represent the height and width of steps through perspective drawing. It also discusses the optical illusions encountered when viewing steps in a drawing versus reality, and the importance of accurate measurements to ensure visual correctness. The text ends by mentioning that the treatise on simplified perspective provides straightforward methods for drawing different staircases. |
| Mancy - Without - Page 51 |
|
The text discusses comparing the dimensions of doors and landings using perspective, highlighting how vanishing lines converge at the viewpoint. It then explains how to draw a room interior from an angle by positioning an observer diagonally and using reference points for accurate representation. Emphasis is given to measuring and transferring dimensions accurately in perspective drawing. |
| Mancy - Without - Page 52 |
|
The text describes methods for determining points and drawing accurate lines to represent a room's interior in perspective. It explains how to find points E and F using a drawing tool and discusses the relationships between various line segments, angles, and vanishing points. The explanation includes detailed instructions for drawing a door in perspective related to wall measurements, using a pencil holder as a measuring guide. |
| Mancy - Without - Page 53 |
|
This text describes the method for dividing a wall's distance and determining the placement of windows in perspective drawing. Instructions are given for calculating the widths and heights of parts based on specific proportional divisions. The procedure for determining precise dimensions, using parallel and converging lines, is explained in detail for accurate representation using plates and points as references. |
| Mancy - Without - Page 54 |
|
The text is a detailed guide on how to draw architectural perspectives of windows and galleries. It explains using perspective lines and geometrical calculations to ensure accurate proportions and positioning of elements in drawings. The instructions emphasize using certain points of reference and measuring distances to create realistic architectural renderings. |
| Mancy - Without - Page 55 |
|
The text describes a method for determining dimensions and drawing geometrically correct depictions of pillars and their components, such as capitals, using specific mathematical ratios and geometrical techniques. It explains how to use geometrical and perspective planes to understand and depict elements in drawing, utilizing the example of a box figure from a reference plate. The instructions include measuring and comparing angles, dimensions, and lines to achieve accurate perspective representations, with a focus on practical execution techniques for artists. |
| Mancy - Without - Page 56 |
|
The text describes the alignment and drawing of columns and their capitals in perspective, ensuring they match specific measurements and relationships with pillars. The first column is used as a basis to replicate the others, with detailed instructions on extending lines and matching dimensions to achieve precision in their depiction. The description also involves constructing vaults above these columns using semicircles and horizontal lines to ensure the correct architectural representation. |
| Mancy - Without - Page 57 |
|
The text details a method to draw a staircase from the side view, using a series of geometrical and perspective techniques. It explains how to measure and set dimensions for each step, highlighting the proportional methods required for accurate depiction. The description includes instructions on how to align lines to a viewpoint and compose parallels to outline the staircase profile. |
| Mancy - Without - Page 58 |
|
The text discusses the principles of drawing landscapes from nature, emphasizing the importance of comparing the sizes of objects to the largest dimension in a composition. It specifically addresses drawing a landscape as seen through a window, detailing how to frame and position the observer relative to the window. The method involves careful measurement and comparison to ensure faithful reproduction of the landscape. |
| Mancy - Without - Page 59 |
|
This text describes the method of dividing a window's width and height into equal sections to analyze perspective and distance using points of convergence in a drawing. It explains the procedure to draw open window shutters and suggests techniques for comparing lengths and angles with a protractor. The lesson further includes steps for drawing objects, towers, and terrains using perspective to match observed shapes and dimensions on a drawing. |
| Mancy - Without - Page 60 |
|
The text provides instructions for positioning a drawing subject relative to a grid seen through a window, using methods explained in earlier plates. It details how to compare the height and width of natural elements with the grid's dimensions to draw landscapes directly from nature. It also introduces techniques for selecting and representing an engaging portion of a landscape using a small frame of reference. |
| Mancy - Without - Page 61 |
|
The text elaborates on the use of an instrument intended for determining a painting’s field of view, also referring to artistic concepts such as perspective and depth. It describes how to use the instrument to define the limits of a tableau, emphasizing the need for proper distancing in landscape art to ensure accurate representation. Additionally, it covers guidelines for comparing dimensions and adjusting positions to maintain spatial relationships within a composition. |
| Mancy - Without - Page 62 |
|
The text discusses methods of finding and comparing points and distances in drawing from nature. It describes techniques to measure and compare heights and widths of objects in landscapes and buildings using reference points and comparisons with trees and mountains. Additionally, it explains the concept of reflections in water, where the surface acts like a mirror reflecting objects placed at its edge, maintaining the same size as the objects reflected. |
| Mancy - Without - Page 63 |
|
The text explains methods to determine the reflection of objects like sticks and towers on water, considering their position and orientation. It provides detailed instructions on how to calculate the length and direction of reflections, using perpendiculars and comparing sizes. The text includes notes on perspective and optical phenomena related to reflections. |
| Mancy - Without - Page 64 |
|
The text discusses basic concepts of aerial perspective, focusing on shadows and how light affects them. It explains how objects appear smaller and less distinct as they move away due to the transparent air filling the space between planes. The passage emphasizes the importance of accurately depicting shadows and details to maintain the natural depth and realism of a painting. |
| Mancy - Without - Page 65 |
|
The text discusses how atmospheric conditions affect how far and clearly one can see, impacting the perception of landscape details. It provides guidance on how to shade landscapes when drawing, emphasizing the use of contrasts and the effects of different planes and reflections. Techniques for drawing through a window or in open fields are also explained, using sticks or other markers to compare tones and perspectives. |
| Mancy - Without - Page 66 |
|
The text provides guidance on understanding shadow and light in drawings. It discusses how different lighting and shading techniques affect the perception of objects in art, suggesting methods for beginners. It also describes the effects of light and shadow on both rounded and angular objects, offering advice on how to sketch effectively using various drawing tools. |
| Mancy - Without - Page 67 |
|
The text explains how shadows are lengthened or shortened based on the sun's position relative to the horizon. Shadows are shortest at noon and longer during sunrise and sunset. There's also a note indicating the end of the first and second segments or parts of the book. |
| Mancy - Without - Page 68 |
|
The text discusses the principles of drawing the head either from life or using a bust as a model. It emphasizes accuracy and fidelity to nature, with a methodical approach to proportions and the drawing of different head positions. The text is divided into three sections focusing on overall head structure, proportion details, and drawing head features. |
| Mancy - Without - Page 69 |
|
The text discusses a drawing method emphasizing drawing from real objects rather than copying drawings, starting with simple shapes before progressing to the human head. It critiques the traditional approach of starting drawing practice with facial features and promotes a natural progression, ensuring the student understands perspectives and proportions. Additionally, it outlines a technique for constructing an oval shape for head drawings, explaining the operations necessary for different head positions. |
| Mancy - Without - Page 70 |
|
The text details methods for drawing ovals representing a face viewed from different angles: front and three-quarters. Steps include dividing vertical lines and using arcs to shape an oval, likening parts to egg form. The instructions emphasize the process of forming outlines and contours of a head, with specific geometric guidance for artists. |
| Mancy - Without - Page 71 |
|
The text provides instructions on drawing the mass of a head viewed in profile from a bust or nature. It details the positioning of the observer, the measurement of dimensions for accurate representation, and finding the inclination or movement of the head. It includes guidance on using tools to determine and compare various dimensions and angles. |
| Mancy - Without - Page 72 |
|
The text provides a detailed method for measuring and drawing a bust, highlighting specific points on the model and correlating them with a diagram. It describes how to align parts of the model with specific lines and dimensions, ensuring proportions remain consistent. The author offers guidance on observing a bust from different angles and suggests techniques for ensuring accurate representation in drawings. |
| Mancy - Without - Page 73 |
|
The page discusses methods for drawing human head proportions, focusing on lines of operation and geometrical constructions. It explains using vertical lines to determine the inclination and alignment of facial features, specifically addressing how to proportion the face into equal parts. Additionally, it describes calculating the width of shoulders and their height relative to the neck, ensuring symmetrical representation in drawings. |
| Mancy - Without - Page 74 |
|
The text discusses the practical applications of studying head proportions from both ancient sculptures and nature when learning to draw. It addresses a common objection, emphasizing that while classical proportions provide a foundation, understanding natural variations is key to capturing the likeness of diverse subjects. The importance of recognizing unique facial characteristics and applying these observations to achieve resemblance in drawings is highlighted. |
| Mancy - Without - Page 75 |
|
The text outlines a method for drawing the head in profile, focusing on dividing the head into equal parts to properly position facial features like the nose, mouth, and eyes. Various lines and points are described to maintain correct proportions, serving as operation lines that guide the drawing process. Detailed instructions ensure that the dimensions for features such as the mouth and ear follow the established proportional relationships. |
| Mancy - Without - Page 76 |
|
The text explains the proportions and positioning of facial features and head angles in drawing. It details how certain features, like the neck and eyebrow, relate in size and alignment, including considerations for different head positions. The guidance includes observations on how the head's inclination affects the lines of operation used in drawing. |
| Mancy - Without - Page 77 |
|
The text discusses the method of dividing the human head into sections and drawing operational lines for an accurate artistic representation. These guidelines vary depending on the head’s angle, such as when tilted to the side, affecting how features like the nose, mouth, and eyes appear. It also explains the use of tools like a pencil holder for drawing curved lines and discusses the importance of foreshortening in creating realistic perspectives. |
| Mancy - Without - Page 78 |
|
The text describes the method for dividing the head's proportions when viewed from the front, focusing on places of key facial features like the mouth and eyes. The guide uses specific measurements, with the head divided into four equal parts vertically and provides proportional details for features like the mouth and nose. It includes technical instructions on drawing these features accurately, emphasizing the importance of straight lines and proportions in achieving a true representation. |
| Mancy - Without - Page 79 |
|
The text describes the proportions and positioning of facial features when viewed from the front and tilted forward. Key aspects discussed include the distances and sizes of the eyes, nose, and ears relative to each other, with guidelines for accurately portraying these elements. Methods for judging line curvatures when drawing a head positioned this way are also detailed. |
| Mancy - Without - Page 80 |
|
This text explores the proportions and foreshortening of the head and face when viewed from different angles, such as the head tilted backward. It describes how the divisions of the head change when viewed from the front and discusses specific anatomical features like the neck, eyes, and nose positioning. Techniques for drawing these features using parallels, operational lines, and comparisons are also provided. |
| Mancy - Without - Page 81 |
|
The text discusses the proportions and positioning of a head in a three-quarters view, where the head is seen from an angle between profile and face-on. It explains the proportions of the facial features and how they change perception compared to other views. The document provides specific measurements to maintain accuracy in representations of the head at this angle. |
| Mancy - Without - Page 82 |
|
The text discusses the proportions of a child's head compared to an adult's, with a focus on profile and front views. It explains how the dimensions and placements of facial features like the nose, eyes, and mouth differ. The sections include detailed comparisons and measurements, emphasizing the more rounded shapes in children's heads. |
| Mancy - Without - Page 83 |
|
This text provides instructions on drawing a child’s head from various angles, focusing on proportion and measurement. It describes how to determine proportions of facial features—such as the mouth, ears, and eyes—by comparing them to other parts like the nose and chin. The passage also gives instructions on using diagrams and recommends tools for achieving precision. |
| Mancy - Without - Page 84 |
|
This section discusses the external structure and position of the eyes. The text explains how the eyes are suspended and directed by muscles, and how the eyelids function to protect the eyes from light. Details about the eyelids' positioning and their impact on the eye's visibility in different positions are also covered. |
| Mancy - Without - Page 85 |
|
This text describes the visual changes in the representation of the eye from different perspectives, such as full face, profile, and three-quarters view. It explains how the visibility and shape of the iris and pupil change with these angles, and how eyelid thickness affects the appearance of the eye. The document also discusses measurements and proportions needed to accurately depict these variations in drawings. |
| Mancy - Without - Page 86 |
|
The text explains how to depict an eye from different angles, including profile and frontal views, focusing on how the pupil, iris, and eyelashes appear. It emphasizes that the perceived position where the eyelashes converge changes based on the observer's view. The text highlights various positions of the eye as looking upwards, downwards, and closed, detailing the changes observed in the eyelids and eye muscles. |
| Mancy - Without - Page 87 |
|
The text describes the proportions and measurements of the nose when viewed from the front, detailing how its width relates to its height. It also explains the methods for accurately capturing these dimensions and angles when drawing, considering variations in head inclination. Additionally, the text covers the proportions of a nose when viewed at a three-quarter angle, emphasizing the consistent relationship between width and height. |
| Mancy - Without - Page 88 |
|
The discussed text explains the geometric visualization of drawing noses in various perspectives, including the front, three-quarters, and profile views. It details how different lines divide the nose's width and base into proportional parts, essential for achieving accuracy in rendering noses from distinct angles. It describes the adjustment of these measurements depending on the view and the head's tilt in different illustrations. |
| Mancy - Without - Page 89 |
|
The text discusses techniques for drawing the nose and mouth in different positions and angles. It refers to proportions and guidelines, such as using lines to divide facial features accurately. The concept of modeling or shaping the nose and mouth is emphasized, along with specific figures referenced for examples. |
| Mancy - Without - Page 90 |
|
The text explores the structure and proportions of the mouth from various perspectives, particularly focusing on the differences between seeing a mouth from the front, three-quarters, and profile. It discusses the lines of operation and how they change based on the mouth's orientation, with detailed examinations of the upper and lower lips. The latter part describes various expressions and their impact on the shape and orientation of the mouth. |
| Mancy - Without - Page 91 |
|
This text explains drawing the human ear, focusing on viewing and portraying ear proportions accurately. It provides instructions on depicting ears from different angles, including from the front and profile, and how to understand dimensions by conceptualizing them within geometric shapes. The explanations emphasize the importance of comparison between various parts and using foreshortening techniques when needed. |
| Mancy - Without - Page 92 |
|
The text describes the method for drawing the human body from nature or a plaster cast, starting with studying proportions. It outlines three sections of study: the proportions of figures, movement and gravity, and sketching techniques for the figure's mass. The approach is explained through dividing the body into eight equal parts for proportional accuracy. |
| Mancy - Without - Page 93 |

|
This text explains the proportions of the human body using the head as a unit of measure. It details the relative lengths and widths of different body parts in terms of head lengths, both from front and profile views. The method aids in studying and verifying human anatomical proportions using a scaled approach. |
| Mancy - Without - Page 94 |
|
The text discusses the proportional differences between figures seen from the back and front, stressing how the ideal beauty proportions can vary due to foreshortening. The document also compares the physical proportions of men and women, noting that while heights are similar, widths vary slightly, with men generally having longer waists. The passage provides a detailed explanation of comparing parts of the body in terms of head lengths for better artistic accuracy. |
| Mancy - Without - Page 95 |
|
The text discusses the differences in body proportions between women and men, noting broader hips and finer limbs in women. A section provides guidelines on how to draw these differences. Another section describes the proportions of children, dividing a child's height into segments relative to the size of the head, providing detailed instructions on drawing these features from different angles. Emphasis is on using simple lines to capture movement and proportions effectively. |
| Mancy - Without - Page 96 |
|
The text discusses two types of body movements: hinge and rotational, describing where and how these occur in the body. It explains the movements at different joints such as the elbow, knee, wrist, and hips, emphasizing proper understanding to avoid errors in figure drawing. Additionally, it highlights the importance of the center of gravity for balanced and graceful depiction, where understanding its placement enhances the realism and aesthetic of drawn figures. |
| Mancy - Without - Page 97 |
|
The text explains the importance of understanding the center of gravity when drawing figures. It discusses different body positions and how they shift weight and balance, emphasizing various experiments to illustrate these points. The method for drawing a figure using vertical and horizontal lines for accurate proportions is also outlined. |
| Mancy - Without - Page 98 |
|
The text explains methods for drawing human figures, focusing on proportions and alignment using tools like a pencil holder. It discusses measuring head heights and observing shoulder inclinations, which helps accurately represent body movement and positioning, whether standing, seated, or kneeling. The principles outlined emphasize using a consistent scale of eight head heights and how to adjust for perspective and angles in drawing. |
| Mancy - Without - Page 99 |
|
This section discusses the proportions involved in drawing the human hand. It explains that the length of the hand is one-third of the head's length and provides detailed measurements for each finger and segment. The text suggests starting by sketching the basic shape when drawing a hand. |
| Mancy - Without - Page 100 |
|
The text discusses the proportions of hands and feet, emphasizing how different perspectives alter their perceived dimensions. It details how to measure and depict these proportions accurately, referencing specific illustrations. Additionally, it explains the division of the foot into three parts and compares the toes' proportions to those of the fingers. |
| Mancy - Without - Page 101 |
|
The text describes the anatomy and proportions of a foot, providing detailed instructions on drawing the foot in profile, as well as from different perspectives. It explains how to measure proportions, including the diameter and length of toes, the instep, and the malleolus. The text also discusses viewing the foot from the front to understand perspective and foreshortening. |
| Mancy - Without - Page 102 |
|
The text describes the geometric construction and perspective of drawing a foot from various angles. It explains the division of the foot into equal geometric parts and compares views from the front and profile. Additional details cover the construction of the foot's form, showing different positions that affect perception, such as standing on tiptoe or viewing from behind. |
| Mancy - Without - Page 103 |
|
The text explains how the foot appears wider at the base of the toes when walking on tiptoes and details perspectives of a foot in different orientations, including from the front, side, and back. It discusses the geometrical representation of the foot through circles and ellipses and provides a method to draw these perspectives for a viewer. The document guides how to visualize and illustrate the various dimensions and positions of a foot in artistic representation. |
| Mancy - Without - Page 104 |
|
The text discusses the proportions of children's hands and feet, emphasizing measurements and comparisons to adult proportions. For children aged five to six, the length of the hand and foot is related to the height of their head. Details include specific measurements and comparison between children's and adults' bone structure, pointing out the differences in apparent joint articulation. |
| Mancy - Without - Page 105 |
|
The text discusses different figures representing various views and positions of feet and legs, mainly focusing on children's anatomy for artistic purposes. It explains proportions, foreshortening techniques, and methods to draw feet accurately in different positions, comparing them sometimes to adult feet for clarity. It emphasizes the importance of proportion and wraps up with a reference to a comparative table of proportions at the end of the book. |
| Mancy - Without - Page 106 |
|
The text provides guidance on shading techniques for drawing a head or an academy figure, focusing on principles applicable to both natural observation and modeling. It discusses the importance of understanding light and shadow interactions to effectively illustrate depth and form. The document explains the practical application of making an object appear in 'relief' by appropriately managing light and shadow intensity. |
| Mancy - Without - Page 107 |
|
The text discusses techniques for shading the neck and face in drawing, treating the neck like a column with progressively darker half-tones. It explains how light and shadows affect different facial parts, such as the forehead, nose, and chin. It provides detailed instructions on sketching eye globes and understanding light reflection and shadow placement. |
| Mancy - Without - Page 108 |
|
The text discusses techniques for shading a human face, specifically focusing on areas such as the nose, eyes, and lips. It describes the interaction between light and shadow on these facial features to create a realistic appearance, using concepts like half-tones and reflections. Additionally, it advises on the importance of proper lighting when drawing a head from a bust or from life. |
| Mancy - Without - Page 109 |
|
The text discusses techniques for illuminating and shading a face or bust in artwork. It advises on the direction of light and the use of reflections to highlight shapes and create harmony between light and shadow. Additionally, it provides methods for shading, emphasizing the importance of shadows' shapes and their comparison with the background to enhance realism. |
| Mancy - Without - Page 110 |
|
The text discusses techniques for shading a face in art, emphasizing the importance of blending edges and comparing adjacent shadows and highlights. Strategies for dealing with hair, particularly curls, are covered, including advice on sketching hair in relation to light. An additional focus is given to working with paper color and achieving the correct tonal contrasts. |
| Mancy - Without - Page 111 |
|
The text provides detailed instructions on adding highlights and shadows to drawings of heads, using different techniques based on lighting and paper tone. It explains shaping and shading methods, comparing shadows and lights for realistic effects. Additionally, it applies these techniques to both busts and full figures, emphasizing movement, proportions, and lighting considerations. |
| Mancy - Without - Page 112 |
|
The text explains how light interacts with different parts of the human body in artistic representation. It describes the distribution of light, shadow, and half-tones across various body parts when viewed from different angles. Emphasis is placed on understanding the light effects to accurately render and model the figure in art. |
| Mancy - Without - Page 113 |
|
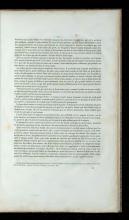
The text describes techniques for depicting figures at different distances, focusing on how shadows and lights change with distance to create depth. It also discusses the limitations of a usual drawing course as purely practical exercises and emphasizes the importance of integrating reasoning and defining the concept of drawing itself. Understanding how to spontaneously draw from nature is highlighted as essential, contrasting with copying talent alone. |
| Mancy - Without - Page 114 |
|
This text emphasizes the importance of drawing from nature as opposed to relying solely on existing illustrations, arguing that true understanding and techniques in drawing develop from this practice. It outlines a method that begins with drawing simple shapes found in nature and progresses to complex forms like human figures, underscoring the value of understanding perspective and proportions. The text also mentions the usefulness of drawing from models once a certain level of proficiency is reached, while highlighting the role of self-directed learning and the eventual guidance of teachers or skilled amateurs. |
| Mancy - Without - Page 115 |
|
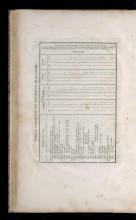
The image contains a comparative table of body proportions, detailing the overall height and various measurements of body parts. It categorizes lengths and extensions, from the head to the foot, providing a framework for artists. This table is part of a guide for artists to understand proportionate drawing methods. |
| Mancy - Without - Page 116 |
|
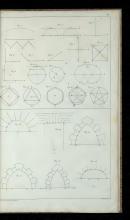
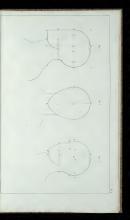
This page consists of labeled diagrams illustrating geometric shapes such as semi-circles, circles, and polygons. These are meant to teach drawing techniques through the use of labeled points. The figures are essential in understanding and replicating geometric proportion and structure. |
| Mancy - Without - Page 117 |
|
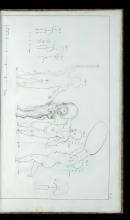
This is Plate 2 from a drawing manual, showing several figures labeled 1 through 6. It appears to demonstrate different aspects of optics and perspective in the context of art, such as the structure of the eye, the effect of light and shadow, and principles of perspective. |
| Mancy - Without - Page 118 |
|
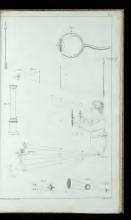
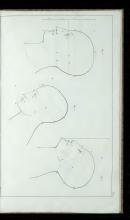
The page is labeled Plate 3 and includes a series of illustrations numbered from Figure 1 to Figure 12. Each figure corresponds to a part of a drawing lesson, focusing on geometric and perspective forms. The images are likely from a 19th-century instructional book on drawing. |
| Mancy - Without - Page 119 |
|
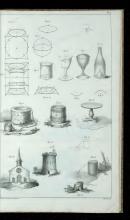
The page contains label annotations for each figure depicted in the drawings. These figures, marked with numbers and letters, show various objects such as geometric shapes, vessels, and architecture. The text serves as labels for each illustration. |
| Mancy - Without - Page 120 |
|
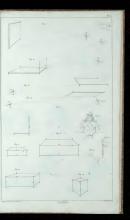
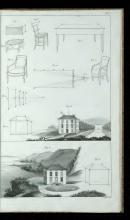
This page includes diagrams detailing furniture and landscape designs to instruct drawing techniques. It features images of chairs, stools, tables, and houses, alongside perspective grids. These diagrams are instructional, demonstrating perspective and object construction methods. |
| Mancy - Without - Page 121 |

|
The page contains architectural drawings labeled as Plate 6 with Figure 1 and Figure 2. These depict interior spaces with detailed architectural features. The text provides simple labels for these figures. |
| Mancy - Without - Page 122 |
|
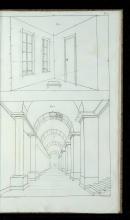
The image contains two detailed architectural drawings demonstrating perspective techniques. Figure 1 shows a room with perspective lines, while Figure 2 features a corridor of arches with columns. Both drawings emphasize structural elements and depth through the use of perspective, likely meant for instructional purposes. |
| Mancy - Without - Page 123 |
|
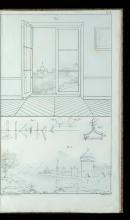
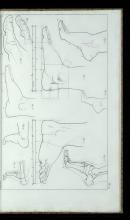
The text describes a series of illustrations focused on perspective and accuracy in art. It depicts landscapes with architectural elements and tools for measuring precision. The images serve as educational guides in incorporating nature with human-made structures and ensuring correct proportions in drawing. |
| Mancy - Without - Page 124 |
|
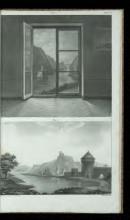
The text simply labels the two drawings as "Fig 1" and "Fig 2." There is no additional descriptive information provided with the text. |
| Mancy - Without - Page 125 |
|
This is a page labeled 'Plate 9' that includes three figures, each annotated with different labels. It appears to be an instructional illustration for drawing. The figures likely serve as examples or templates used in art education. |
| Mancy - Without - Page 126 |
|
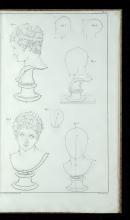
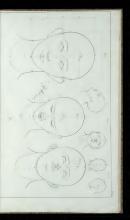
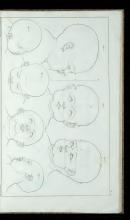
The page from the historic book displays detailed diagrams labeled as figures 1 to 7, which illustrate heads and busts for art instruction. These images help in understanding proportions and angles in portrait drawing. The page is published by J. de Mancy following methods by E. Le Breton. |
| Mancy - Without - Page 127 |
|
The text consists of labels for diagrams, stating 'T. 24' and numbering three figures as 1, 2, and 3. This indicates the figures correspond to teaching illustrations in the book. |
| Mancy - Without - Page 128 |
|
This page contains sketches labeled as figures 1, 2, and 3. It aims to instruct on drawing male profiles from different angles. The sketches are part of a historical pedagogical art publication. |
| Mancy - Without - Page 129 |
|
|
| Mancy - Without - Page 130 |
|
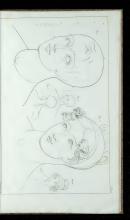
The page is titled "Plate 14" and contains diagrams of a human head from different angles. Each illustration highlights structural lines for drawing instruction. |
| Mancy - Without - Page 131 |
|
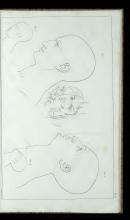
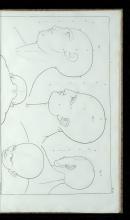
The page features labeled line drawings of human heads, presumably serving as a guide for art students to learn about head and facial structures. These figures are intended to demonstrate various angles and perspectives and are marked as Plate 5 in the instructional book. |
| Mancy - Without - Page 132 |
|
The image contains drawings of a child's head from multiple angles, labeled as Fig. 1 to Fig. 5. The illustrations are likely used for instructional purposes in the context of learning how to draw a child's head accurately. This aligns with the book's educational focus on drawing from nature. |
| Mancy - Without - Page 133 |
|
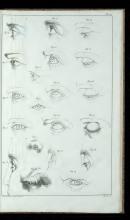
The image includes several labeled sketches of facial features like eyes, ears, and noses, each marked with a figure number. These drawings illustrate different perspectives and details of human anatomy to assist in learning drawing techniques. The focus is on understanding the structure and form of these features, adhering to Professor Le Breton's method. |
| Mancy - Without - Page 134 |
|
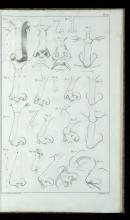
Plate 18 showcases a series of 22 illustrations detailing different angles and shapes of noses, using letters as labels for parts. The illustrations are likely meant for educational use in art and anatomy. The creators, J B Marchand and J De Mancy, are credited in the work. |
| Mancy - Without - Page 135 |
|
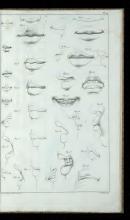
The page is labeled as Plate 10 and contains numerous labeled figures depicting human lips and mouths. The artists, J. De Mancy and A. Morel, are mentioned, with Morel responsible for engraving the sketches. These drawings serve as instructional material for drawing lips from various angles and expressions. |
| Mancy - Without - Page 136 |
|
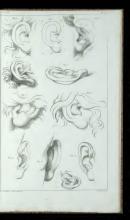
The text provides labels for a series of twelve figures depicting ear drawings. These are crafted by Jarry de Mancy following the teachings of L. Breton. The images are meant to instruct on the realistic portrayal of ear anatomy. |
| Mancy - Without - Page 137 |
|
The text includes figure labels from Plate 21 of the book. These labels correspond to anatomical drawings meant for educational purposes in art. The figures illustrate different human poses and serve as a guide for drawing. |
| Mancy - Without - Page 138 |
|
The image is labeled 'Pl. 22.' No text is included besides this label. It features anatomical sketches possibly serving as learning tools for art students. |
| Mancy - Without - Page 139 |
|
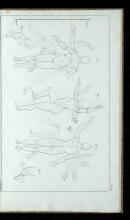
The page is labeled Plate XV and contains figures, numbered from 1 to 4, likely corresponding to the sketches on the page. It provides visual representations of human poses for instructional drawing purposes. These sketches illustrate how to depict dynamic human forms. |
| Mancy - Without - Page 140 |
|
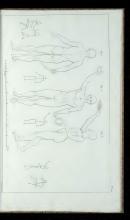
The text labels three figures as 'Figure 1', 'Figure 2', and 'Figure 3', along with the page being labeled as 'Plate 24'. These labels suggest an instructional context, with potentially different poses or viewpoints depicted. |
| Mancy - Without - Page 141 |
|
The image depicts various anatomical sketches with figures shown in different detailed phases. It includes both human figures and a figure with an animal-like head, illustrating drawing techniques and proportion guides. These sketches help in understanding drawing from basic shapes to detailed figures. |
| Mancy - Without - Page 142 |
|
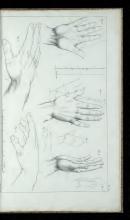
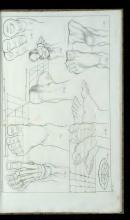
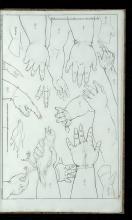
The page contains illustrations of hands with figure labels, likely as part of a drawing instruction. The illustrations serve as examples of hand anatomy and positions. Minimal text accompanies these images, mainly to label the figures. |
| Mancy - Without - Page 143 |
|
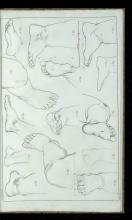
The text contains figure labels for anatomical illustrations of a human foot, labeled Fig. 1 through Fig. 9. These labels accompany detailed drawings of the foot from different angles and include skeletal views. The representations are likely educational, emphasizing the foot's structure. |
| Mancy - Without - Page 144 |
|
The page features several figures labeled as Fig. 1 through Fig. 9, each depicting anatomical studies of feet. These illustrations include both external and internal views, with some diagrams providing proportional measurements. |
| Mancy - Without - Page 145 |
|
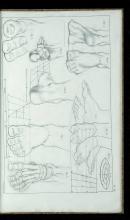
This page contains various illustrations of the human foot, displaying different views and anatomical details, such as bone and muscle structure. The illustrations are meant to help artists understand foot anatomy and depict it accurately in their work. The figures are labeled from 1 to 9 and include perspective studies to assist in teaching proper drawing techniques. |
| Mancy - Without - Page 146 |
|
The text provides labels for nine figures depicting studies of hands and a bird. These illustrations are intended for instructional purposes in the context of drawing and art. Each figure label assists in identifying and understanding anatomical structures. |
| Mancy - Without - Page 147 |
|
The image contains labeled sketches of feet showing various positions for anatomical study or drawing practice. Each sketch is labeled with a figure number, indicating its part in a sequence or study. The illustrations are likely used for educational purposes to teach artistic representation of human anatomy, specifically the feet. |
| Mancy - Without - Page 148 |
|
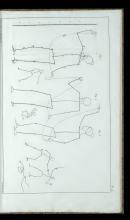
The image contains labels for three figures, which likely represent steps in drawing a human head. Each figure is labeled sequentially as Fig. 1, Fig. 2, and Fig. 3. |
| Mancy - Without - Page 149 |
|
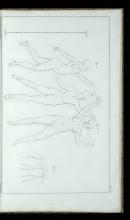
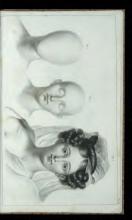
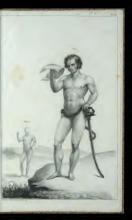
The text labels two figures, "Figure 1" and "Figure 2," on the page. It refers to the foreground figure as a "Traveler," noting that he is presented nude here but is dressed in another illustration identified as figure 51. |
COPYRIGHT © 2025 STUDY DRAWING. ALL RIGHTS RESERVED.