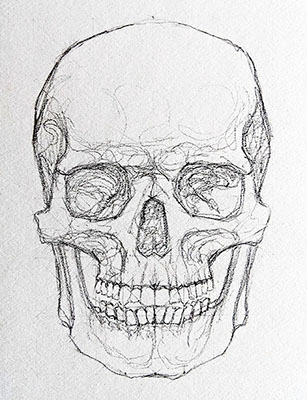
Welcome to the first studydrawing.com anatomy tutorial. This page will show you how to draw a realistic human skull. Unlike other basic skull drawing tutorials, this page will show you a repeatable method of drawing a proportionally accurate skull. Drawing the skull is a great way to begin studying human anatomy. Drawing the skull is the foundation for learning to draw the shapes of the head and learning the forms and masses of the face. This will help you can draw realistic human faces and portraits.
This how-to may seem like it has a lot of steps. However, it is structured in a way that you can repeat this process. Each time you do it, you'll be able to skip steps. The more you repeat this process of drawing the skull, the more you begin remembering and memorizing the shapes and form of the skull. This will help your drawings of faces and heads become more realistic and use correct proportions.
Tools
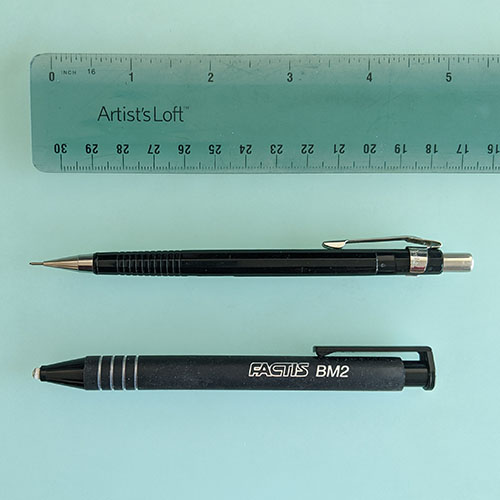
The tools I used for the drawing pictured below are:
This tutorial is structured in a way that you can use any materials. In fact, I encourage you to experiment with different materials. I also recommend that the first time you try this tutorial, you use the materials I recommend, or similar ones. I'll describe the ones I prefer and tell you why.
Ruler: A decent and durable ruler is essential for setting up the drawing grid that I'll describe later.
Eraser: I really love pen-style eraser sticks like these. They are inexpensive and great for precision erasing.
Mechanical Pencil: I prefer a mechanical pencil. I like mechanical pencils for the consistency of line width and no need to sharpen. The drawing process I describe will not have a very broad range of values, so the range that a HB or 2B pencil lead can create will suffice.
Paper or Sketchbook: For a drawing that you many spend some time on, it's good to have durable and thicker paper. Thicker paper can handle erasing much better than thinner paper. I prefer Bristol Board or watercolor paper with a smooth surface and not much texture. In this case, I used a sheet of paper from a pad of Strathmore Vision Watercolor paper, the 6"x9" size.
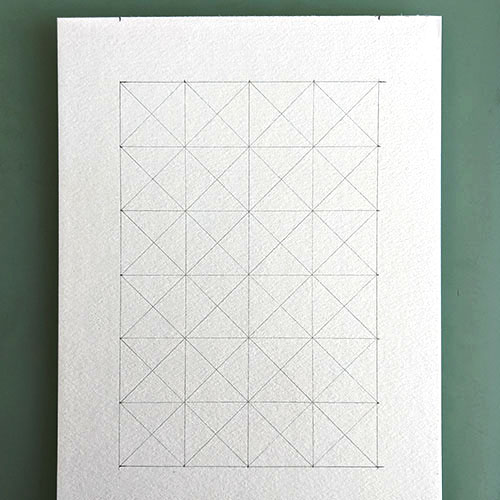
Setup - The Grid (4x6)
The first task will be to set up a 4x6 grid for your drawing. The grid should be 4 equal squares wide and 6 equal squares long, with diagonal lines connecting the corners of each square. In this case, I made each square 1 inch by 1 inch, which meant my grid was a total of 4 inches wide and 6 inches long. You don't have to use a 1 inch by 1 inch unit square.
This procedure for drawing the skull can be enlarged by using larger unit squares, or made smaller. Just make sure your grid, however big you decide to make it, is divided up into 4 equal squares wide and 6 squares long.
The purpose of the grid is to allow you to place the skull's features and proportions accurately. It will also help you keep your drawing symmetrical. Take your time to set your grid up cleanly and accurately, as it will lead to a correctly proportioned drawing.
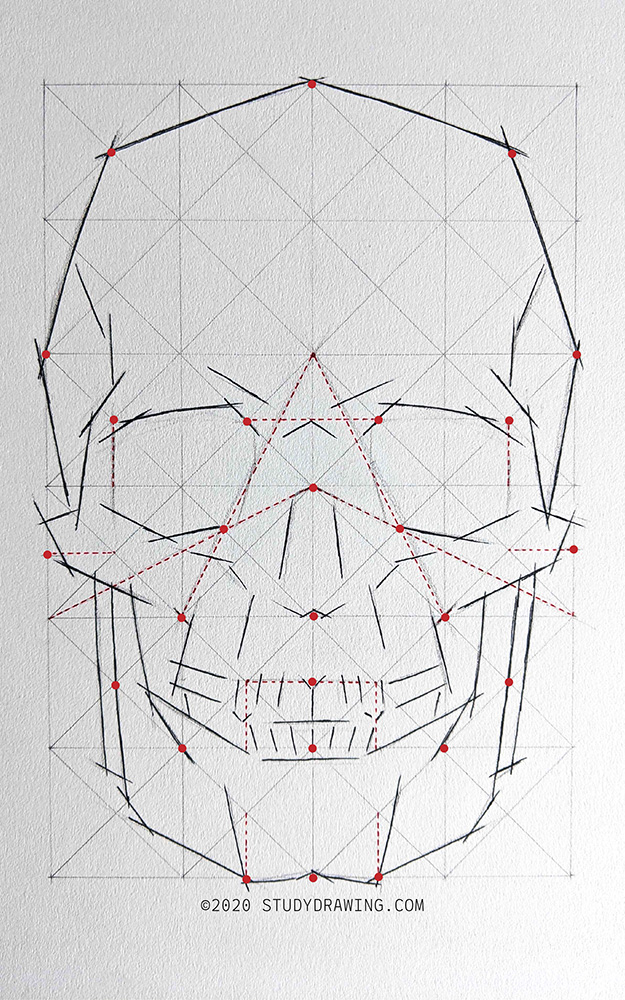
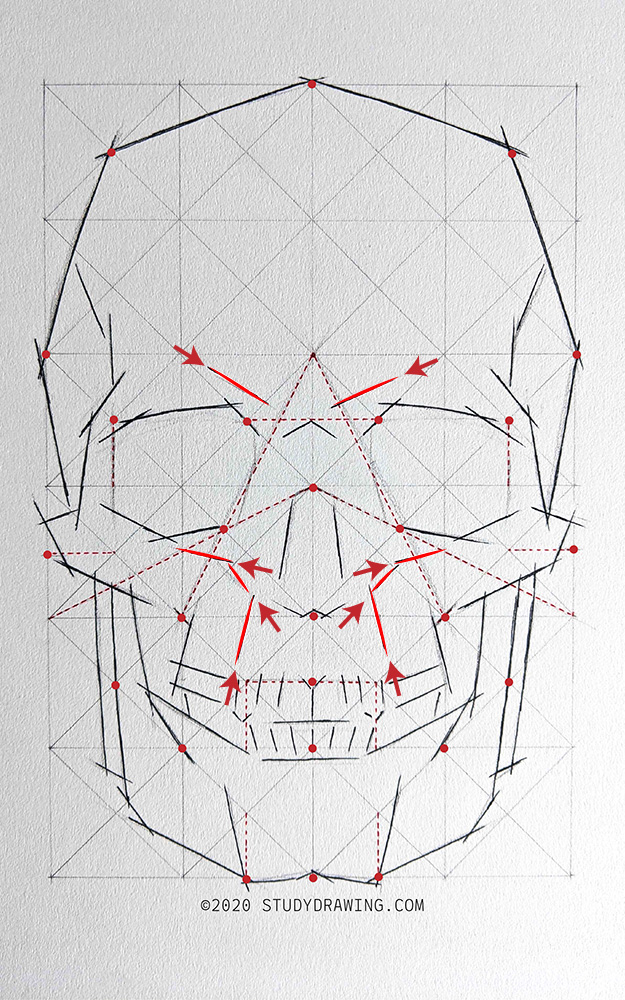
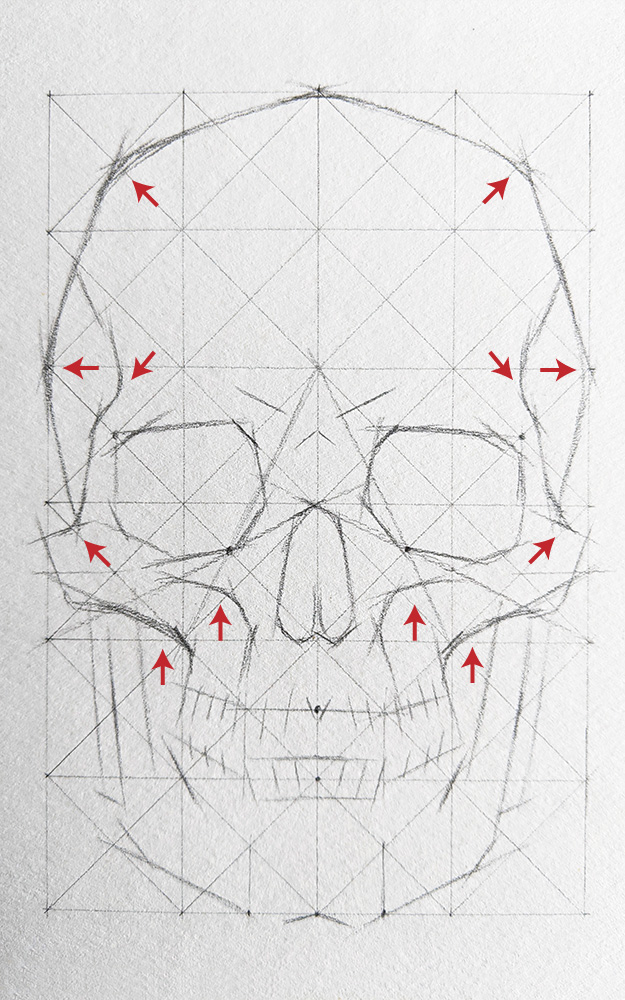
This is the guide image that we will use to develop our drawing of a skull. The process of developing this drawing will be one of placing the red dots, black lines, and dashed-red lines in the corresponding locations on our grid.
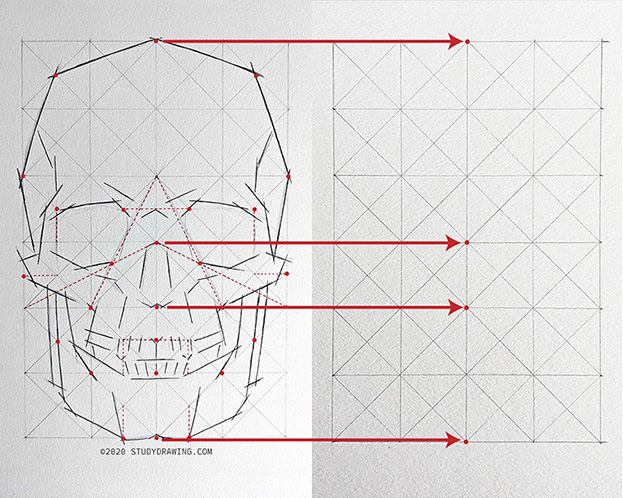
As we proceed and begin our drawing, we are going to start by finding the red dots on the guide image (on the left) and placing a small red dot, with our pencil, in the corresponding location on our grid.
One of the challenges in drawing a skull (and people's heads) is getting the proportions and symmetry correct in the drawing. By using this guide image and grid, you'll be able to map out the form of your skull with correct proportions and symmetry.
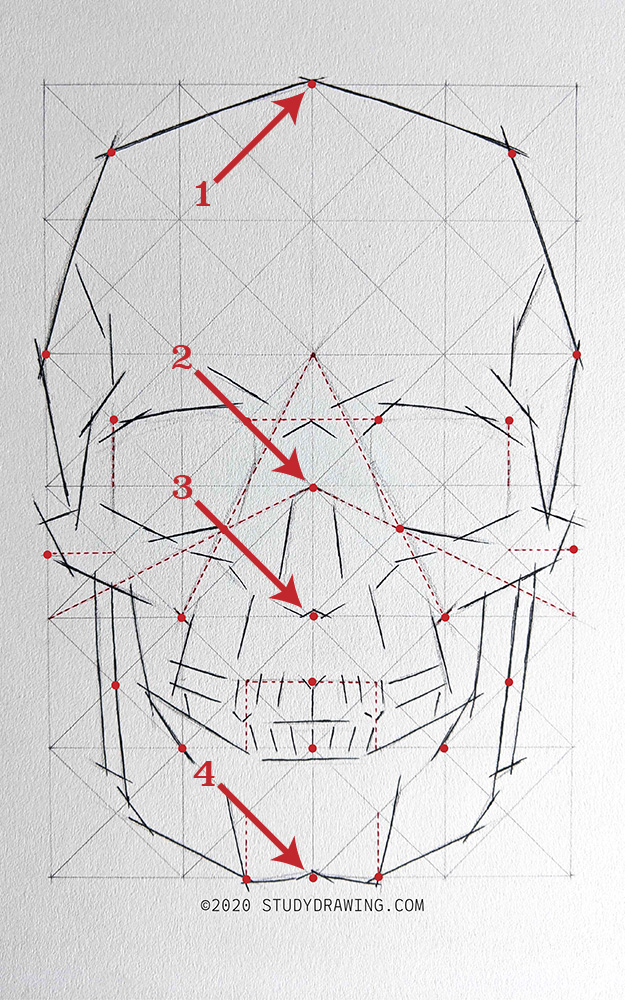
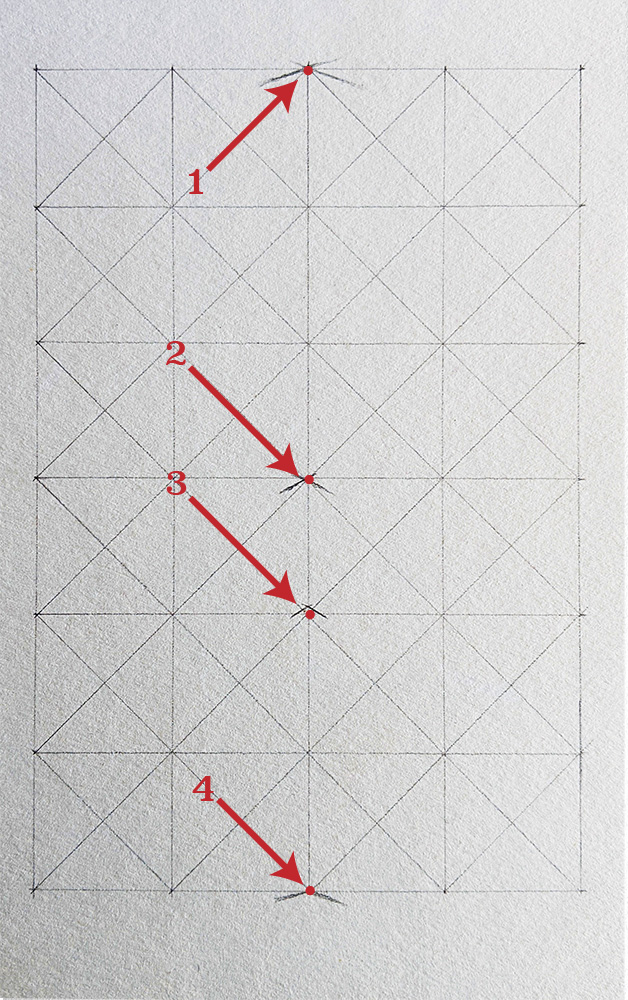
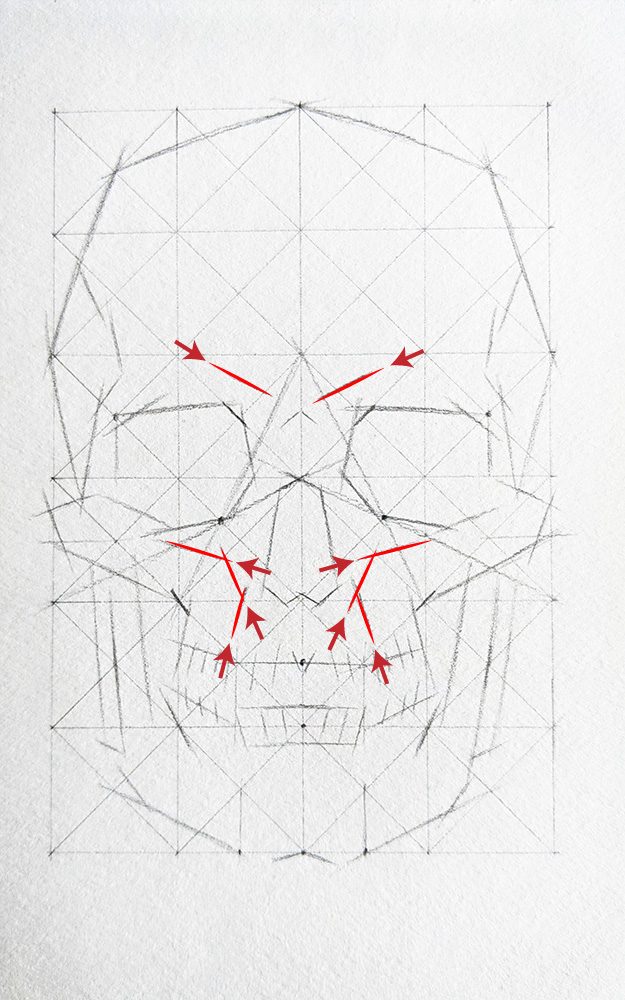
To begin, find the points 1, 2, 3, and 4 as indicated on the guide image (left) and place small dots with your pencil in the corresponding locations on your grid.
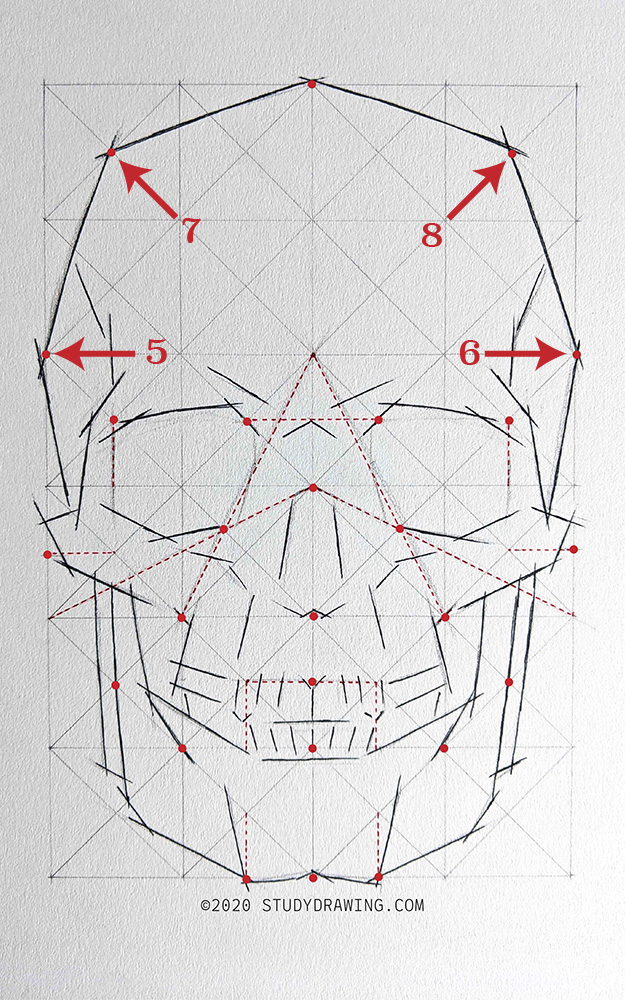
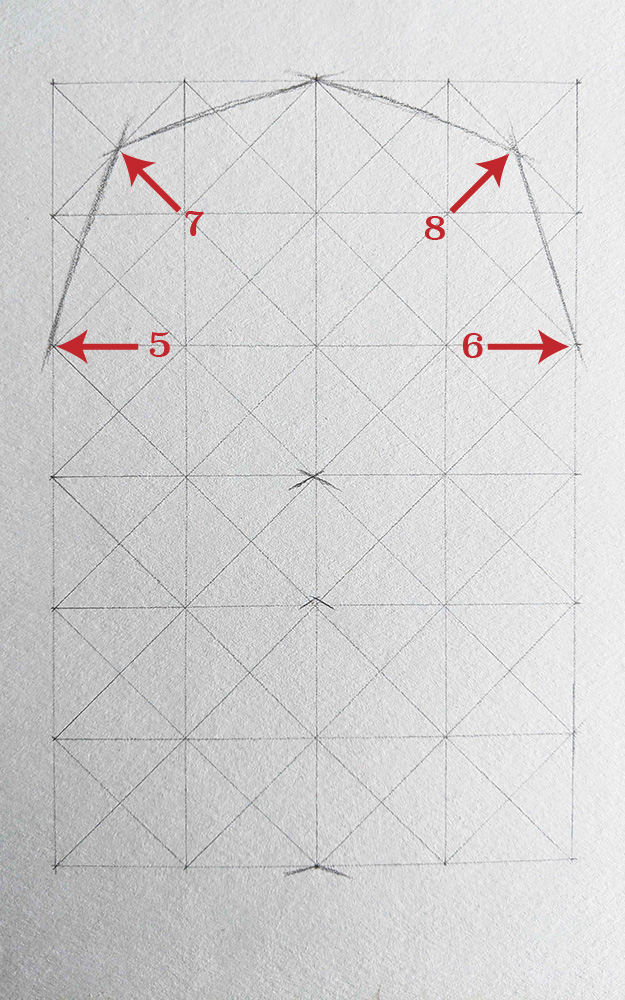
For points 5, 6, 7, and 8, place each point as a small dot on your drawing. For this step, we'll start placing the lines that we see in the guide drawing in our drawing. Draw four light lines to connect these points and form the top of the skull.

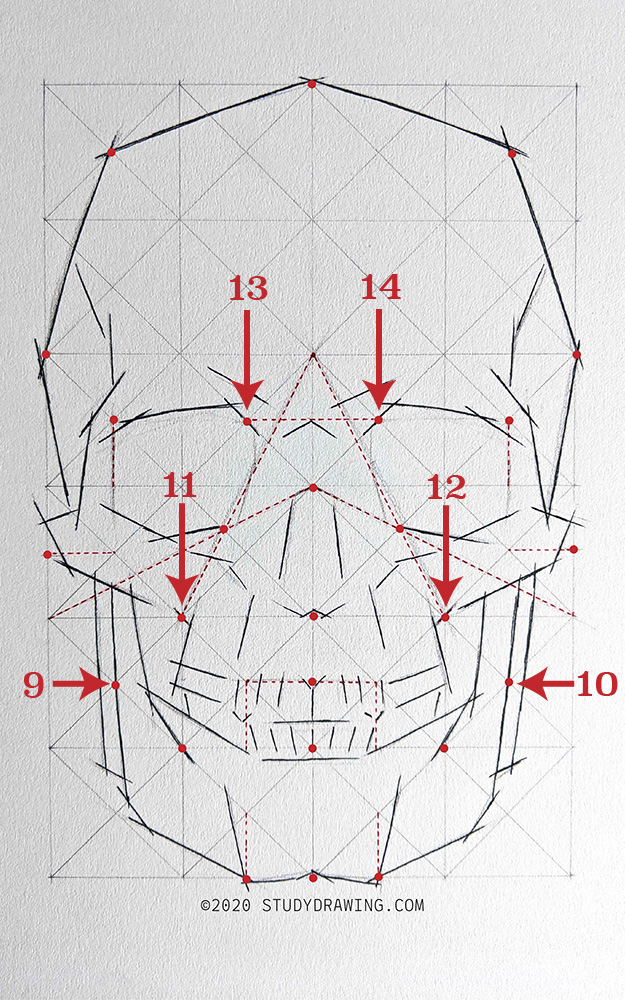
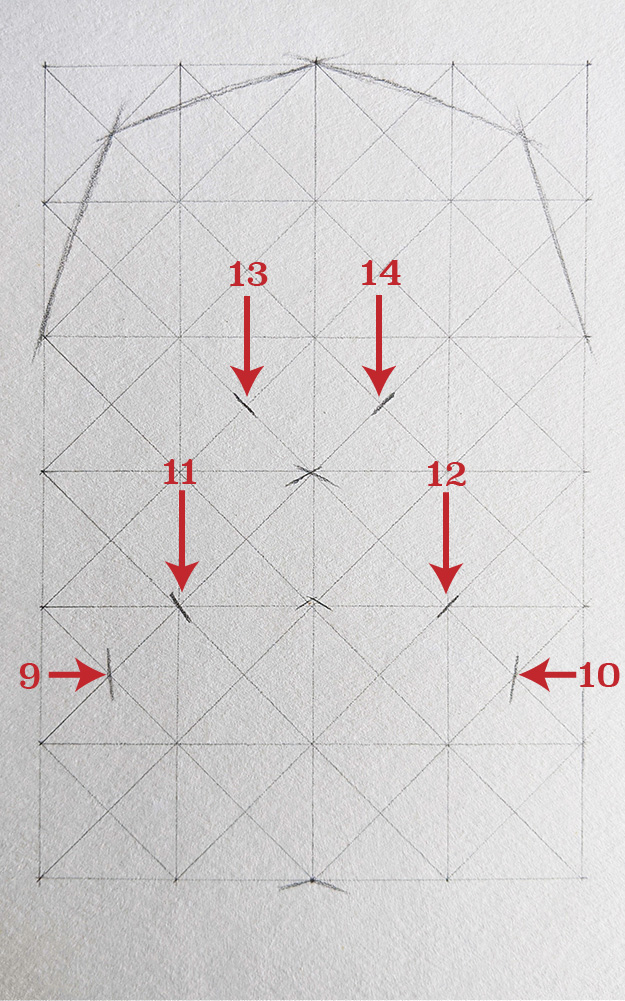
For points 9, 10, 11, 12, 13, and 14, place them as short lines on your grid. These will be used to create longer lines later, but for now just place a short line in the same direction as indicated. The order for these points is intentional and done so that when you place one point, the next point is the same point on the other side of the skull, to keep the two sides of the skull symmetrical.
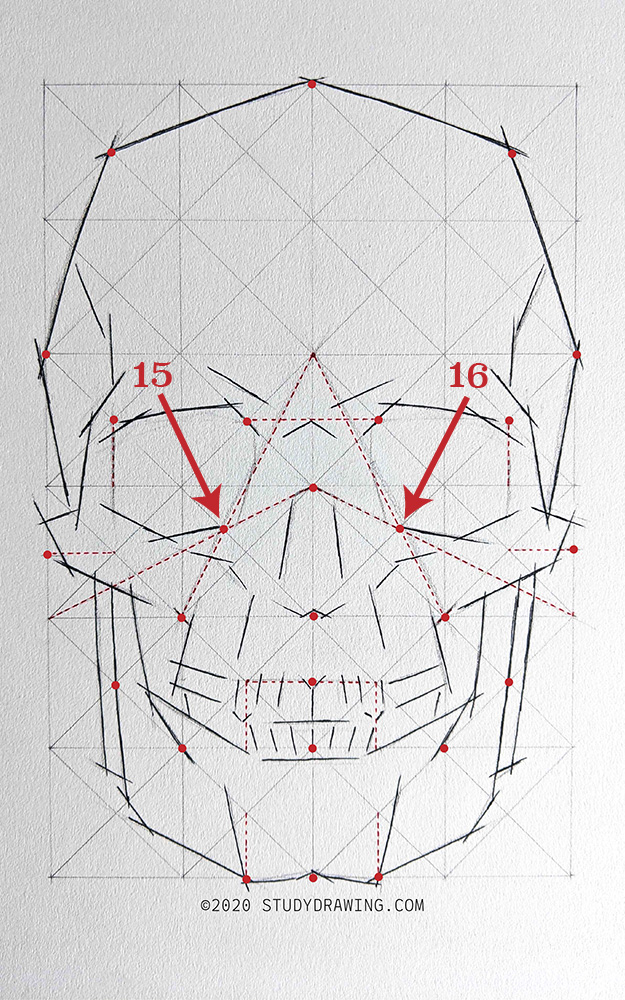
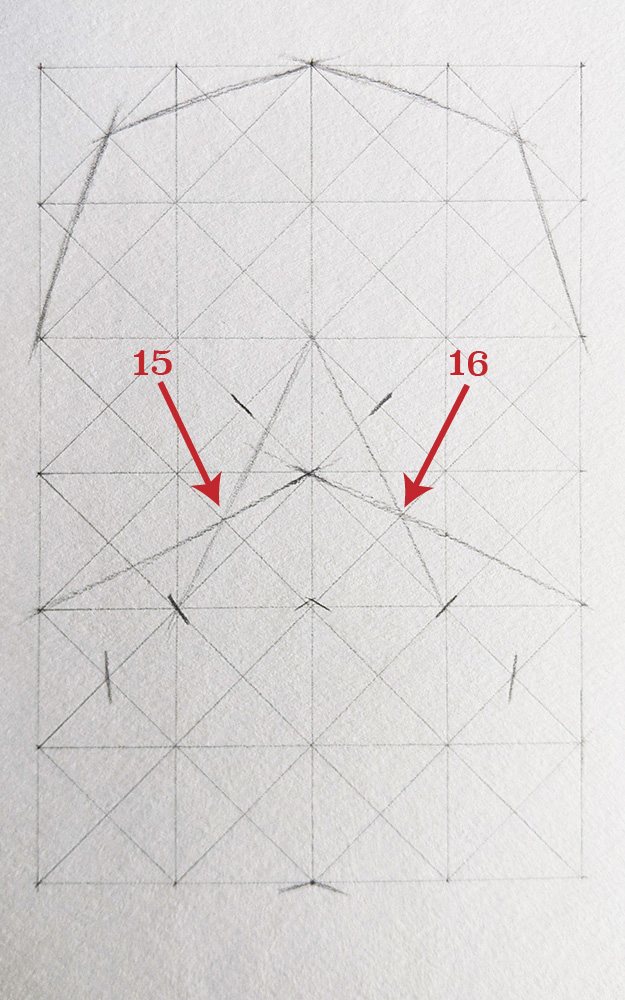
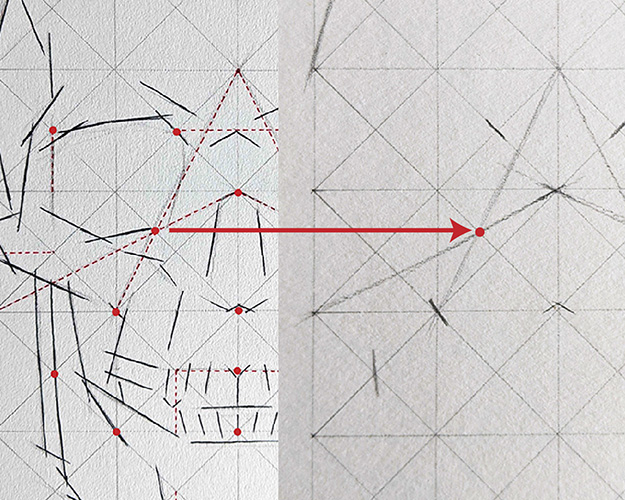
Points 15 and 16 will be placed slightly differently. For these, note the red dashed lines in the guide drawing. Draw, by hand, corresponding lines on your drawing. Place points 15 and 16 on your drawing where the dashed lines intersect.
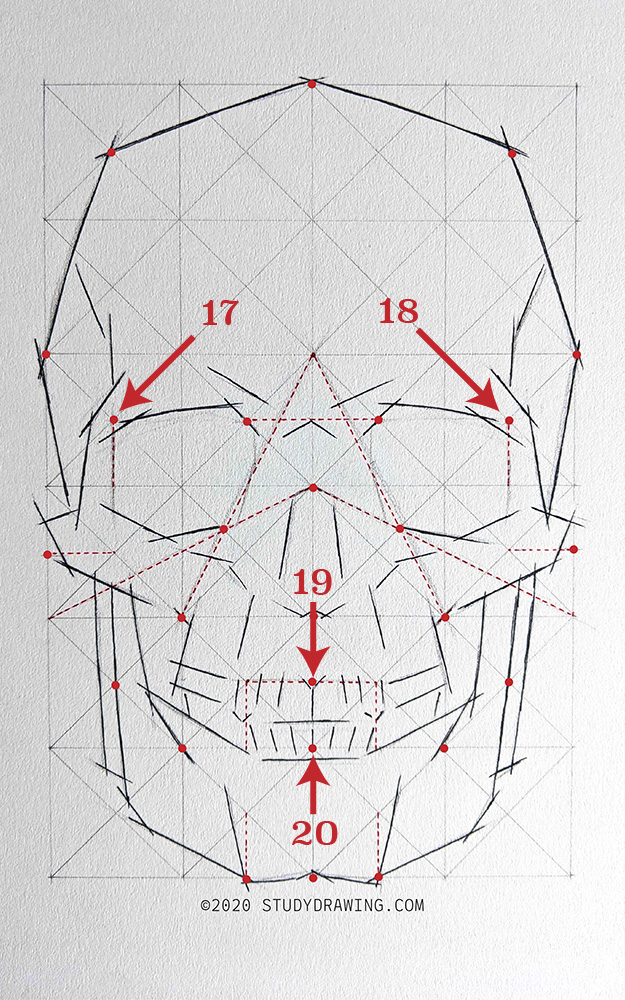
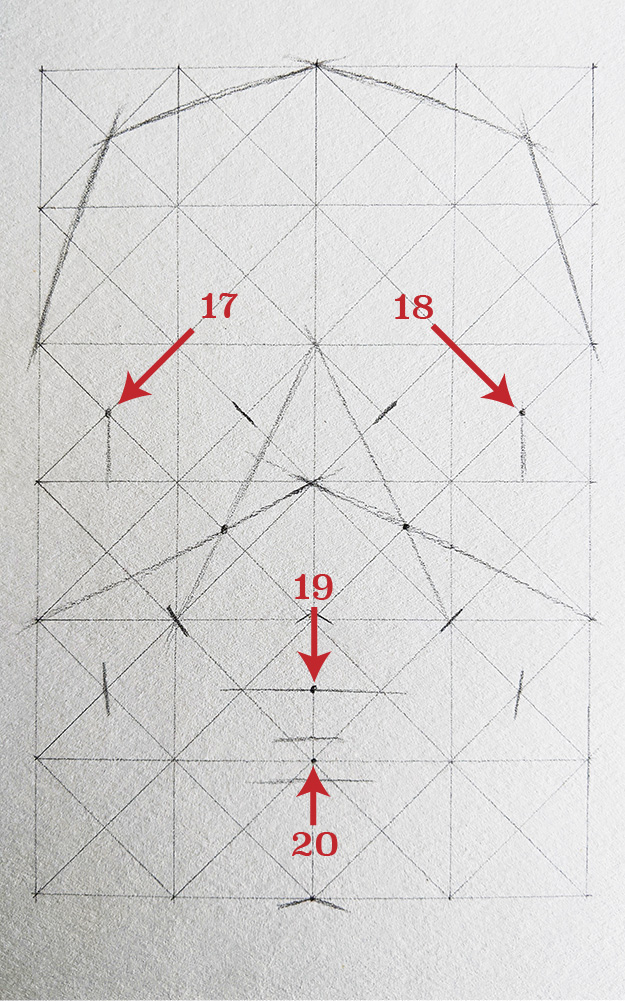
In the same way as the previous step, for points 17 and 18, drop a vertical line from the intersection of the two diagonal lines to the midpoint of the next horizontal line below.
For point 19, draw a light line between the middle points of the squares to the left and right.
For point 20, draw a light horizontal line about a third of the way between point 20 and 19. Then draw another light horizontal line about the same distance below point 20.
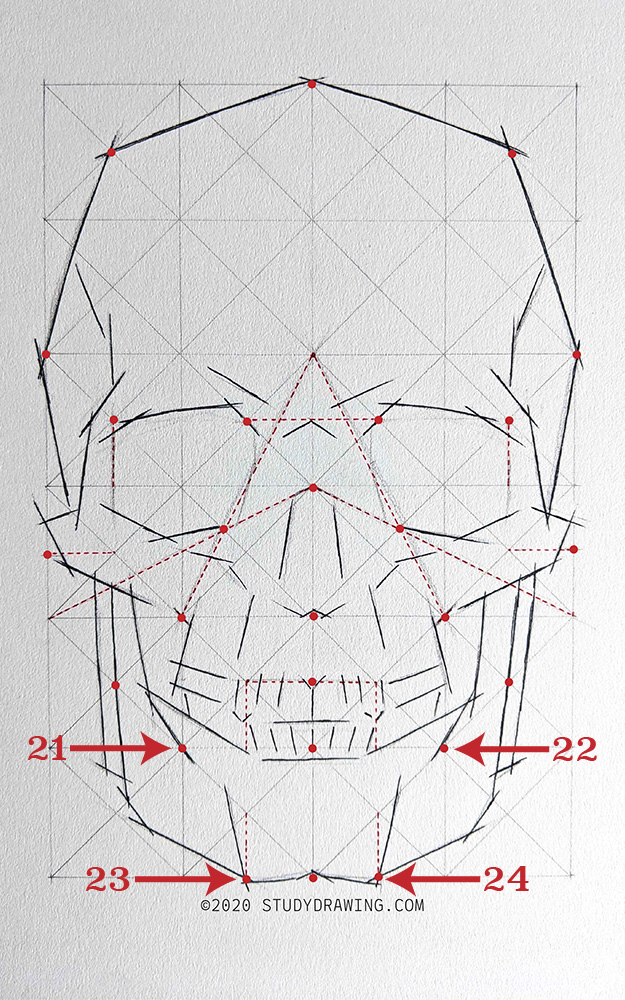
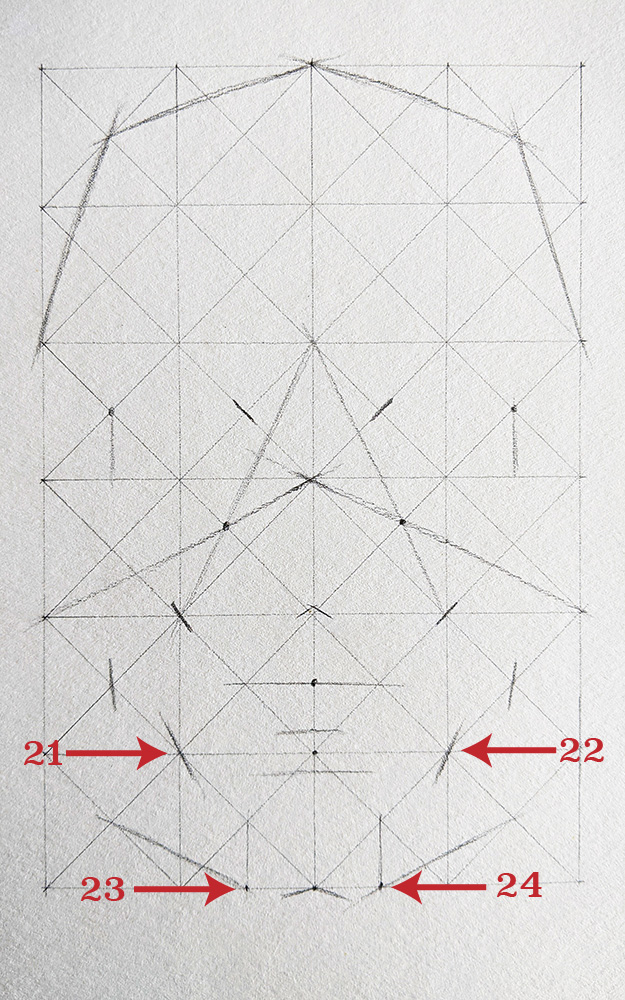
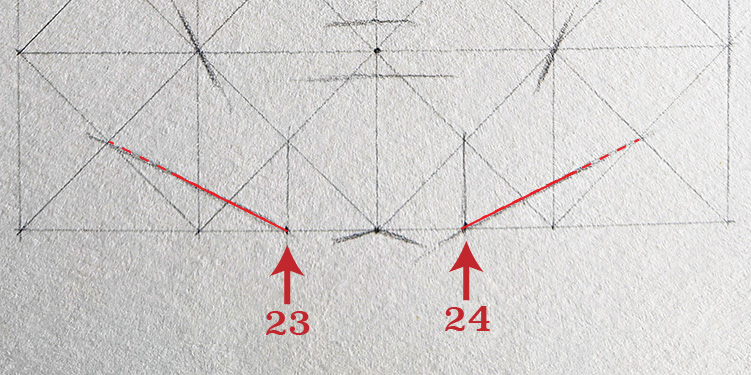
For points 21 and 22, place a light diagonal line. For points 23 and 24, drop a light vertical line from the intersecting diagonal lines above to find the center of the square's bottom horizontal line. This is where to put point 23 and 24.
From each of those points, draw a light line that extends to the middle of the adjacent squares.
In the next steps, the red lines indicate lines you should add to your drawing. The dashed-red lines are aides and there to indicate what point the solid red line extends to. This is to help you place the angle of your red line correctly. Using the corresponding points on both the left and right half of the skull also makes sure these lines are symmetrical.
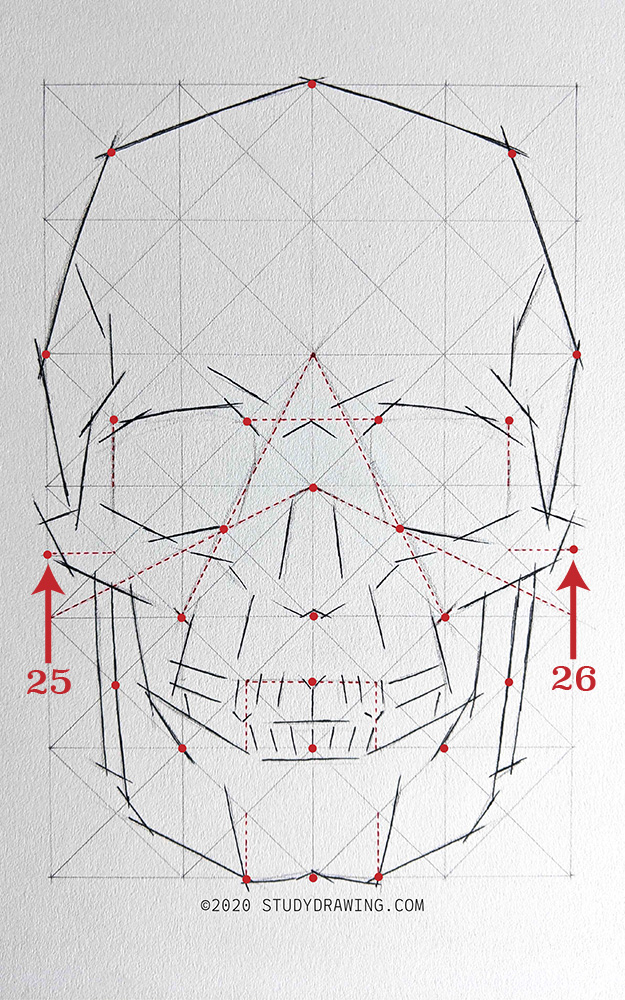
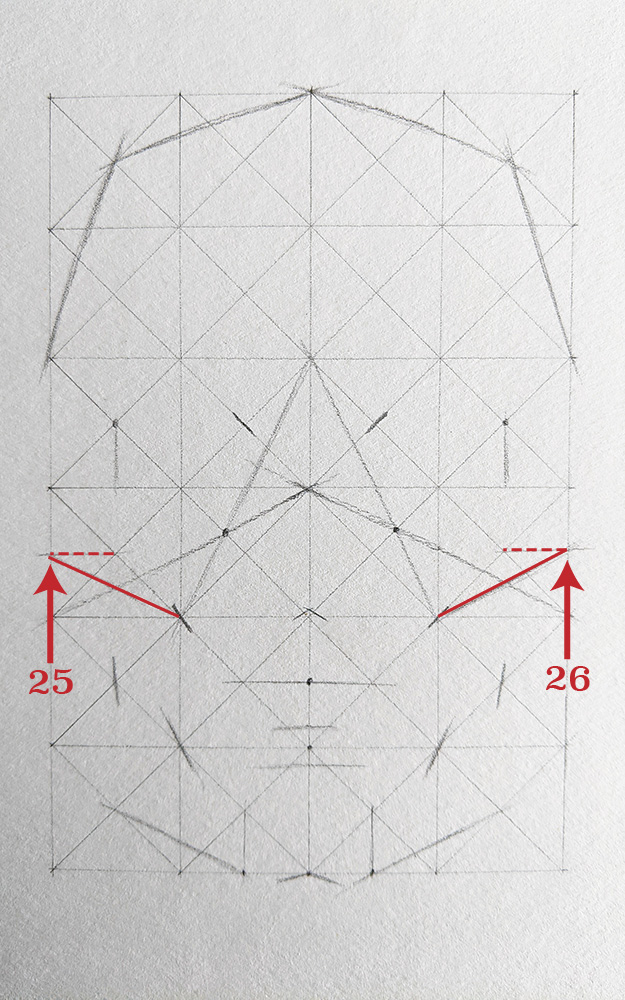
To place points 25 and 26, find the center of the squares indicated, and move horizontally outward to find the middle of the outer vertical line.
These are the last numbered points we are going to place. From here, we will be placing lines (indicated as solid red lines) on our drawing.
Now draw a line from points 25 and 26 to the bottom inner corner of the square. (These are points 9 and 10)
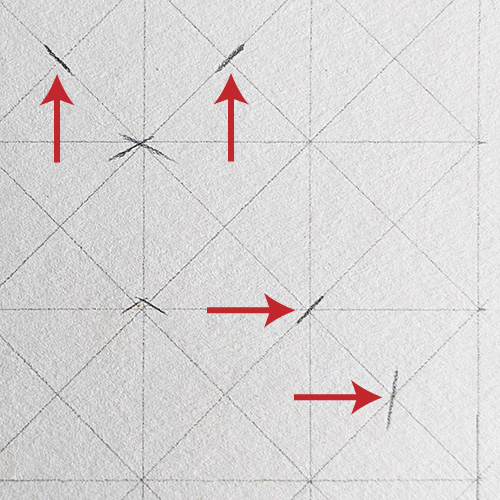
This is the first set of lines that you'll need to place on your drawing without corresponding points on the grid. The key to placing lines like this, as we will do through the rest of this tutorial, is to note how they differ slightly from nearby lines.
For this set of lines, note how each line is either nearly horizontal or nearly vertical. Each of these lines are nearby either vertical, horizontal or diagonal grid lines to compare to.
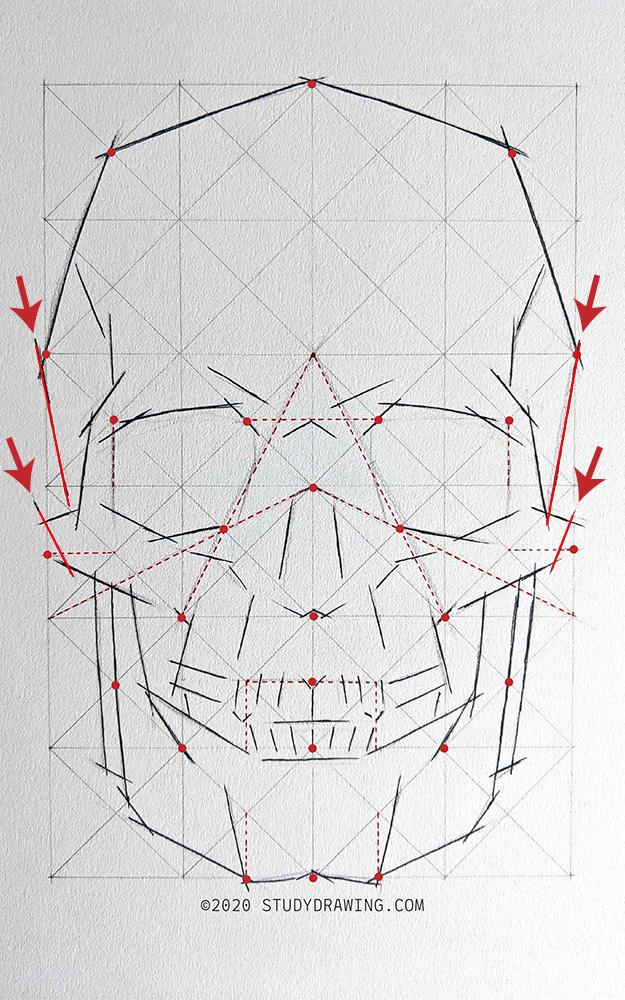
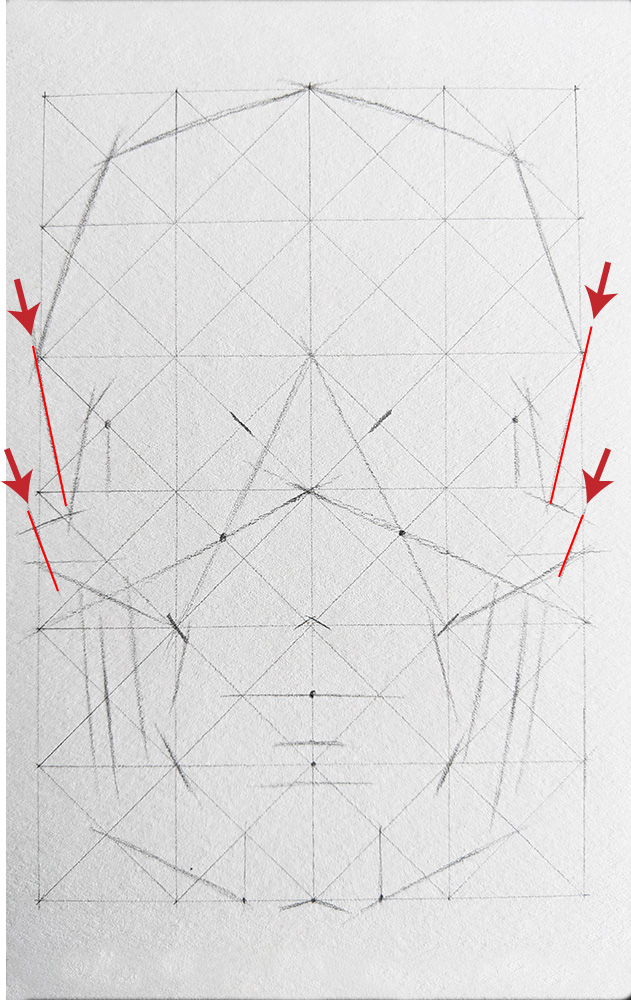
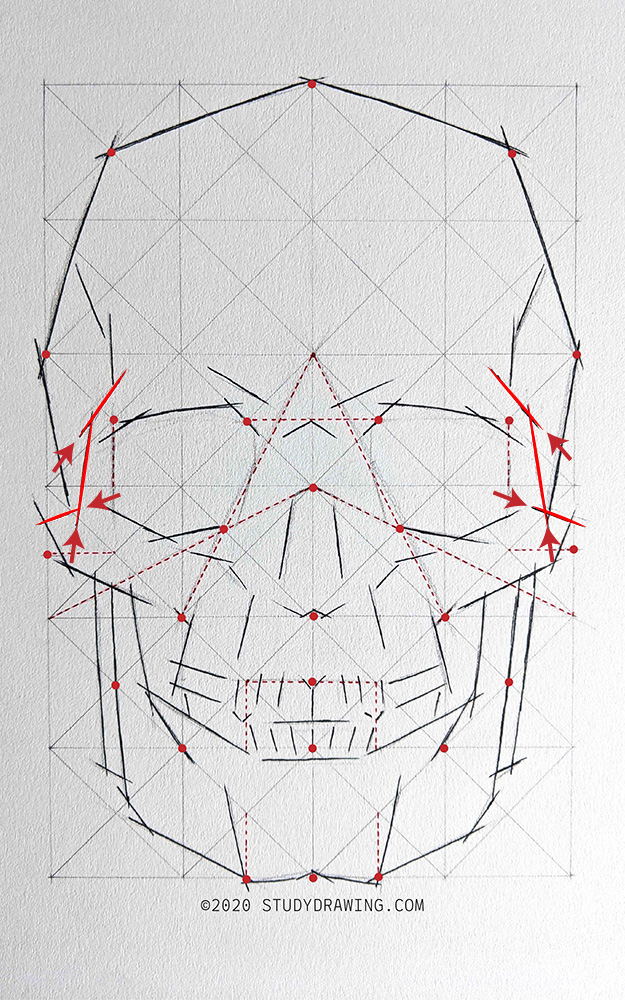
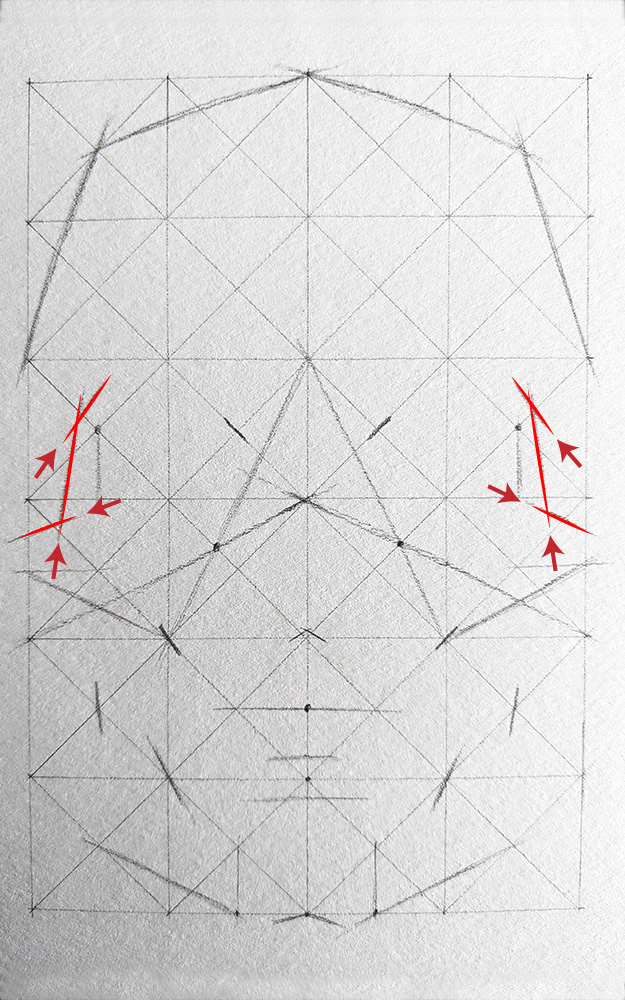
Just like the previous step, you'll need to place these lines free-hand, and without lining up to specific points on the grid. Note how these likes are nearly-vertical, but have slightly different slant.
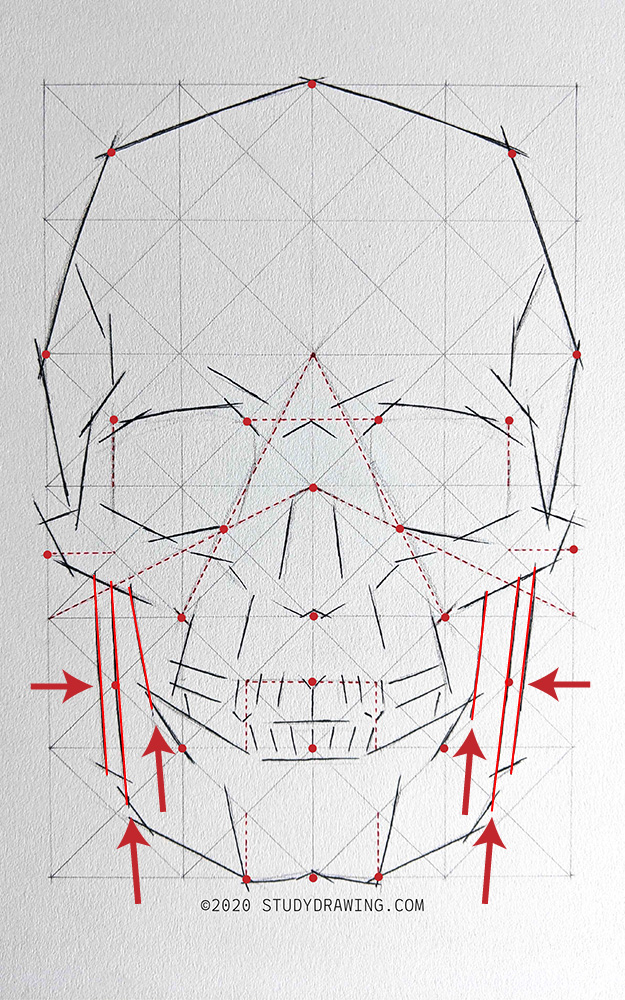
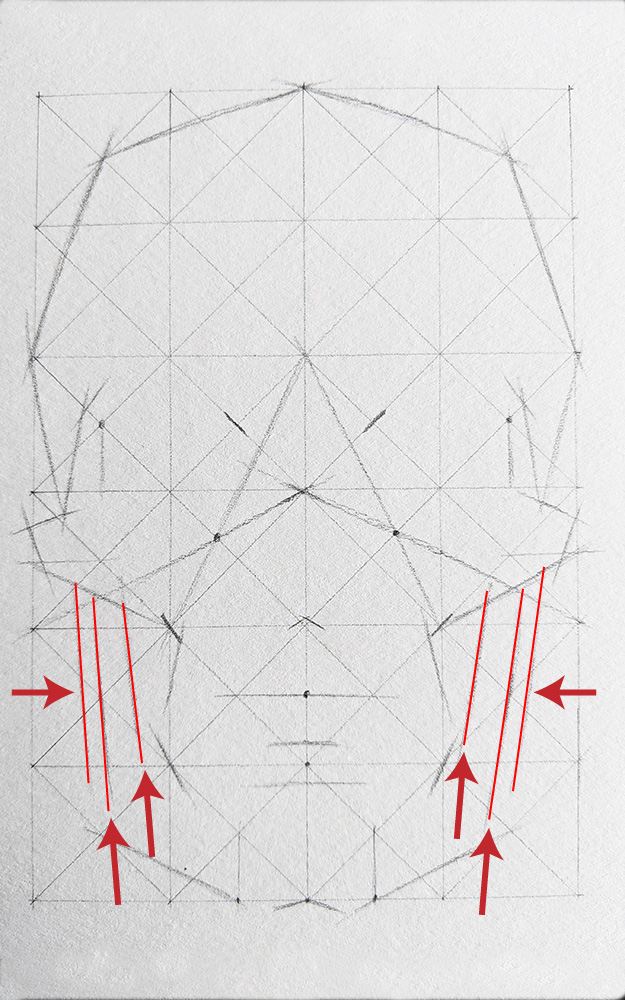
Place these lines free-hand. Note how two of these lines intersect points 9 and 10, placed earlier. The other lines are almost parallel, but not quite.
These are more lines to be placed free-hand, using nearby lines for comparison.
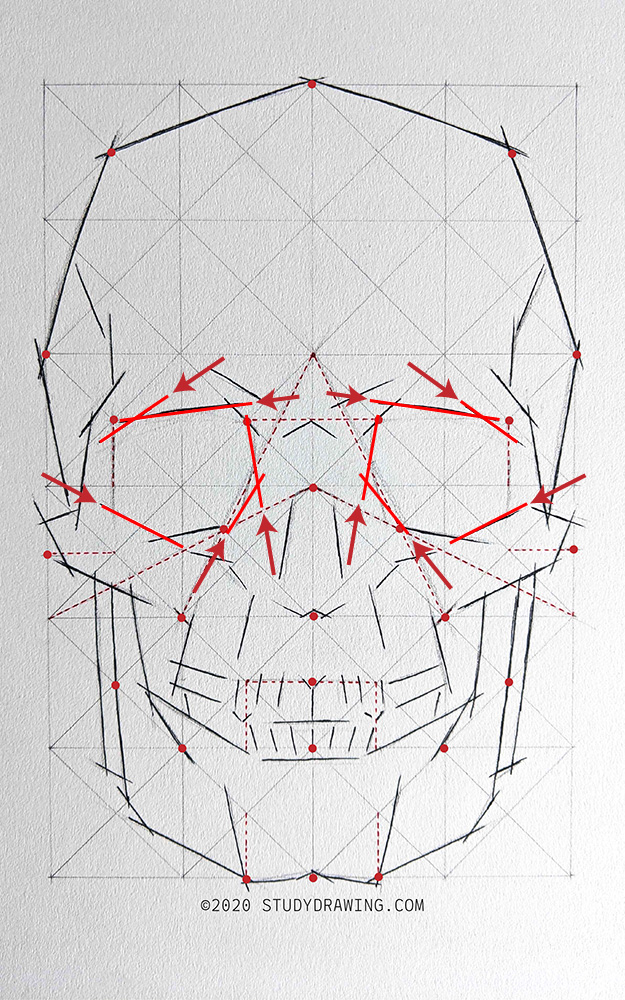
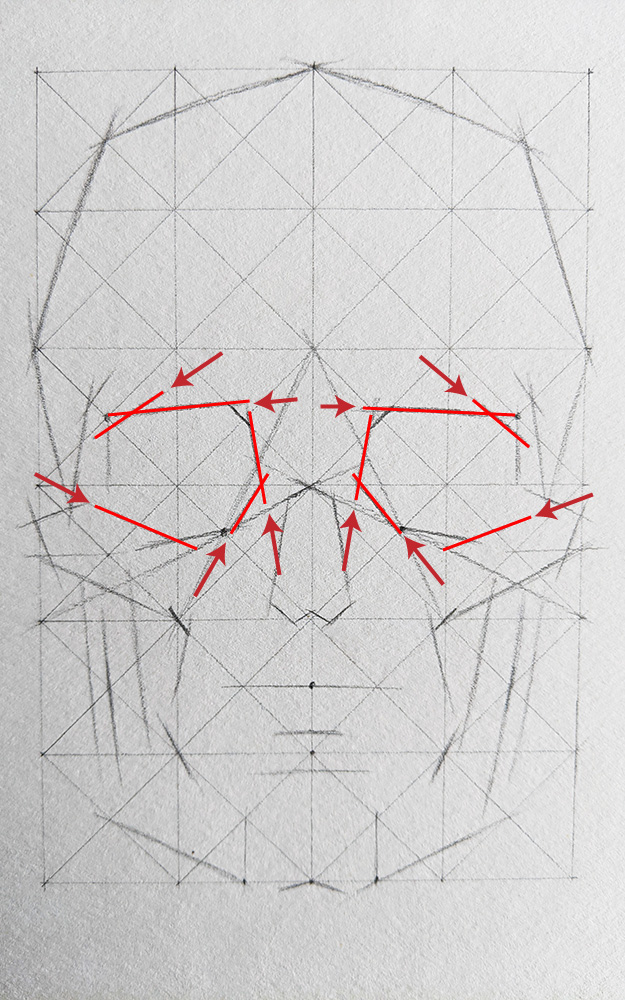
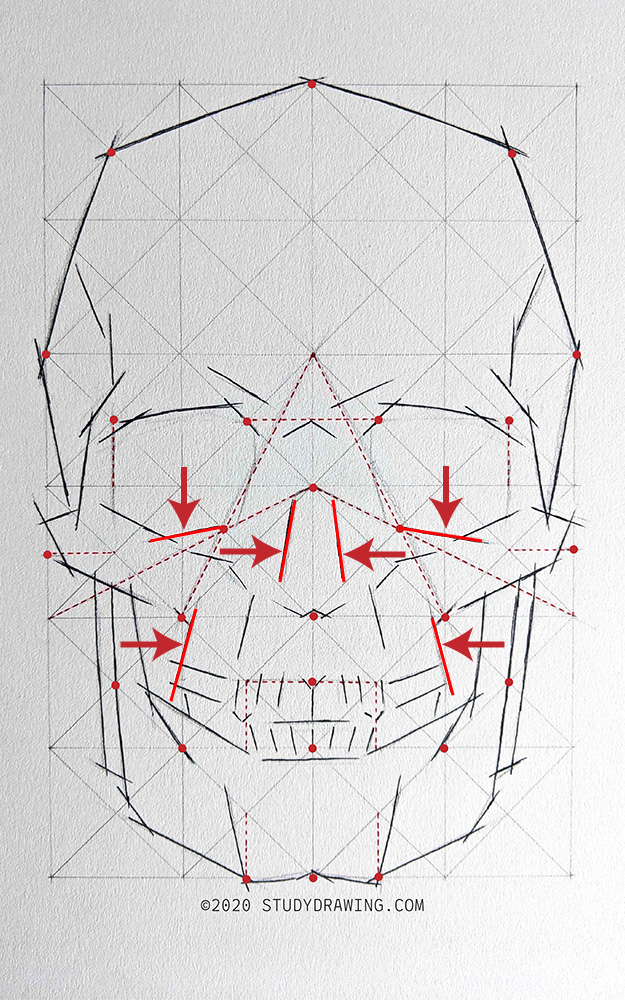
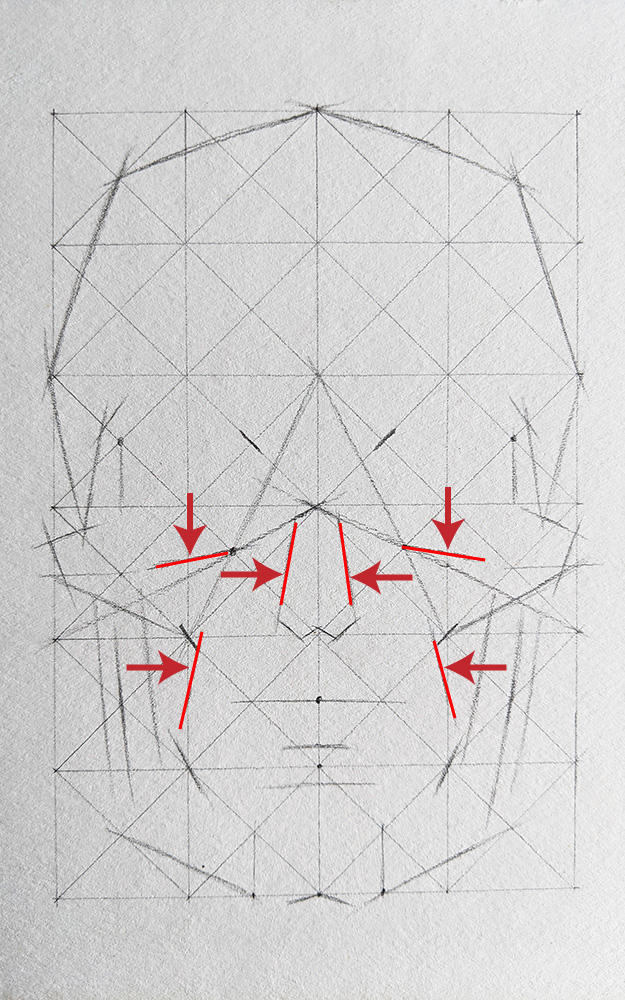
These lines will define the outline of the eye-sockets. Again, this will be a process of placing these lines free-hand by comparing to nearby lines.
Remember that the lines you are placing free-hand, do not need to be placed perfectly. All of these lines you are placing should be done with light pressure so they can easily be erased and moved if needed. Hold off on making any dark or final lines until the end of this process.
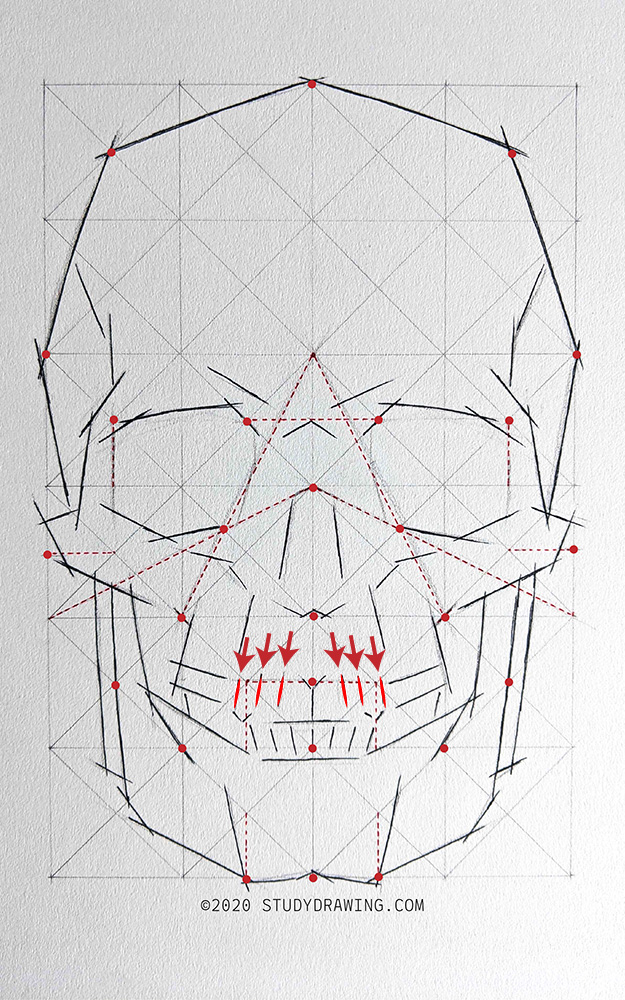
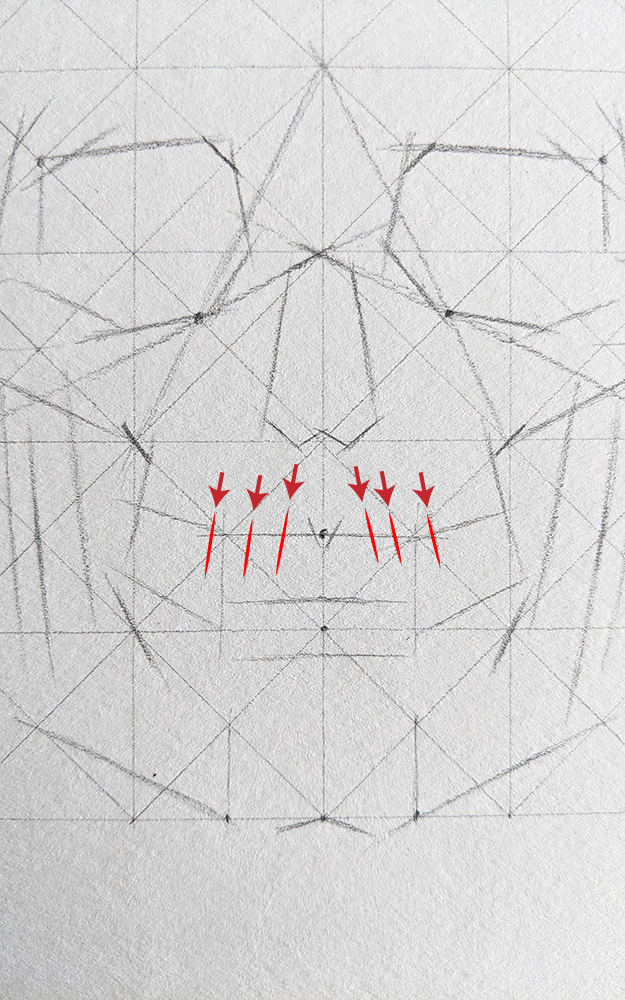
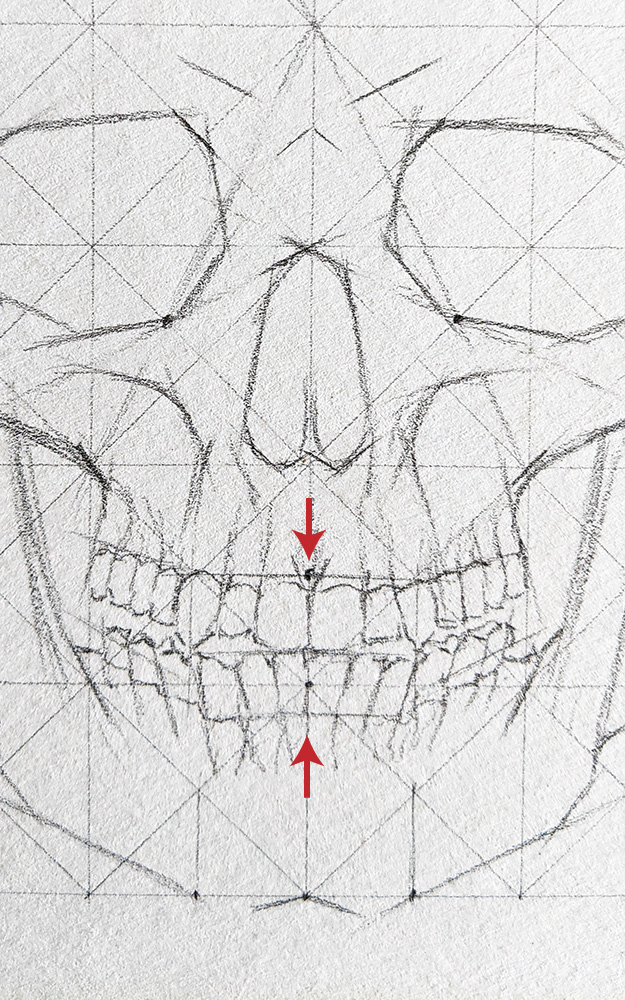
These lines will begin to define the upper and front set of teeth on your skull. For these, just place 3 roughly equally spaced and slightly slanted lines on each side of the center line. Again, these should be light lines placed with light pressure.
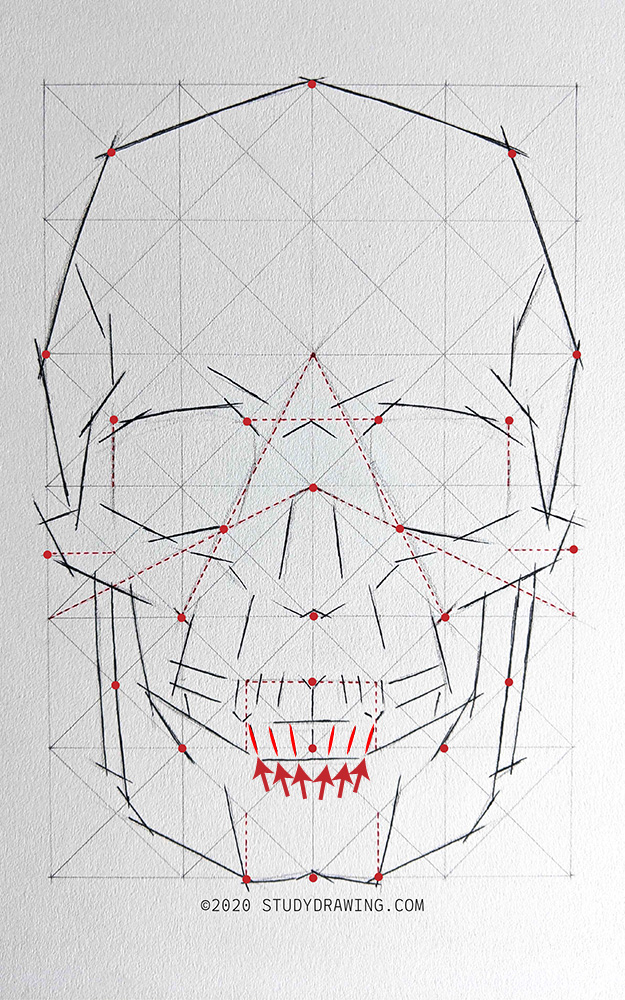
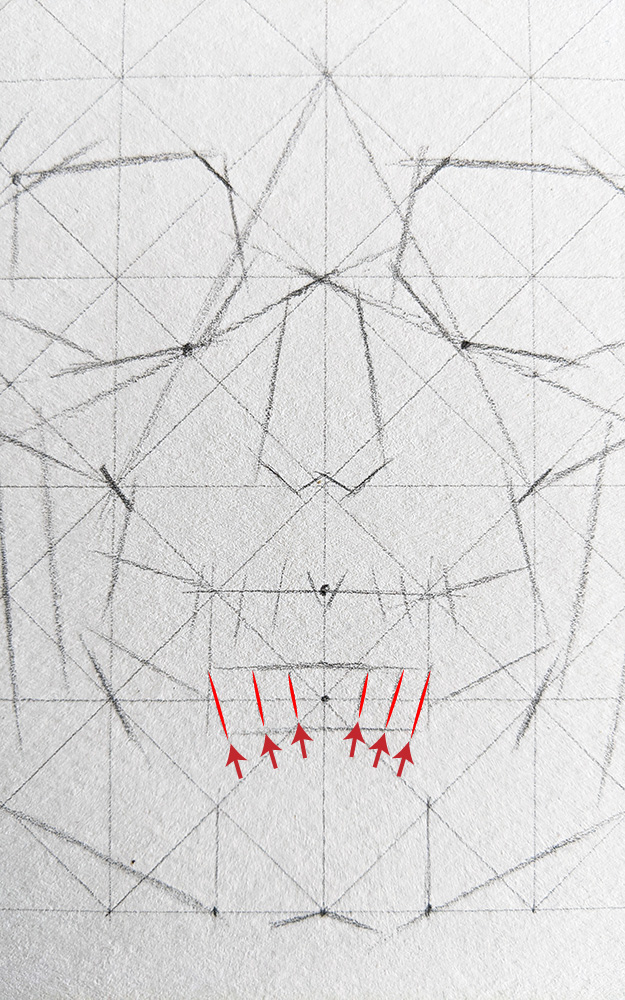
In a very similar manner as the previous step, just place three, roughly equally spaced, slightly slanted lines to indicate the front of the lower set of teeth.
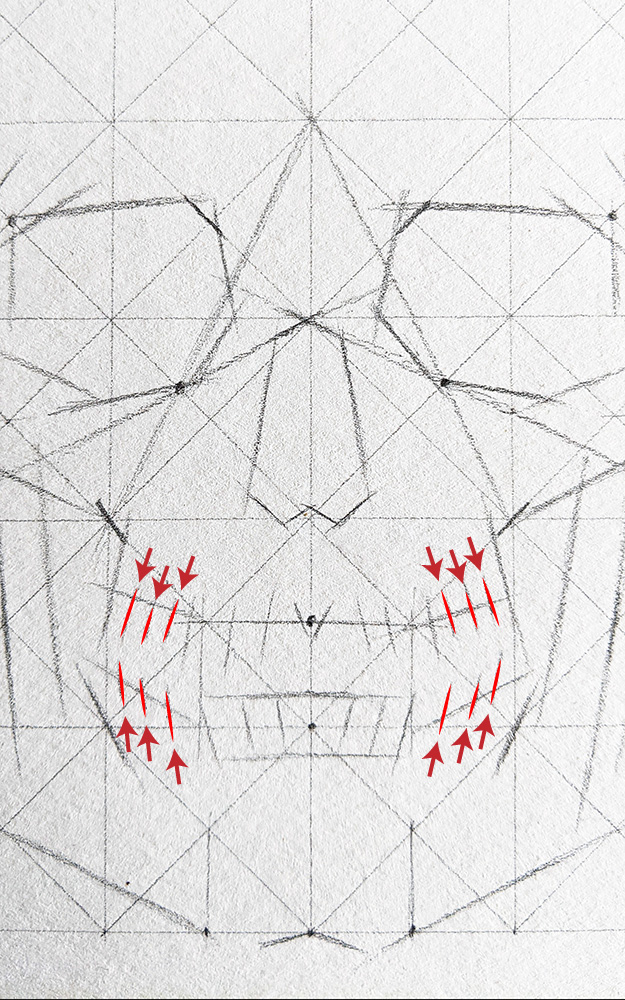
To indicate the back teeth, on the top and bottom, add three slightly slanted lines as indicated. These lines will be shorter and closer together than the front teeth.
This is another set of lines to be placed free-hand with reference to nearby grid lines and other established lines.
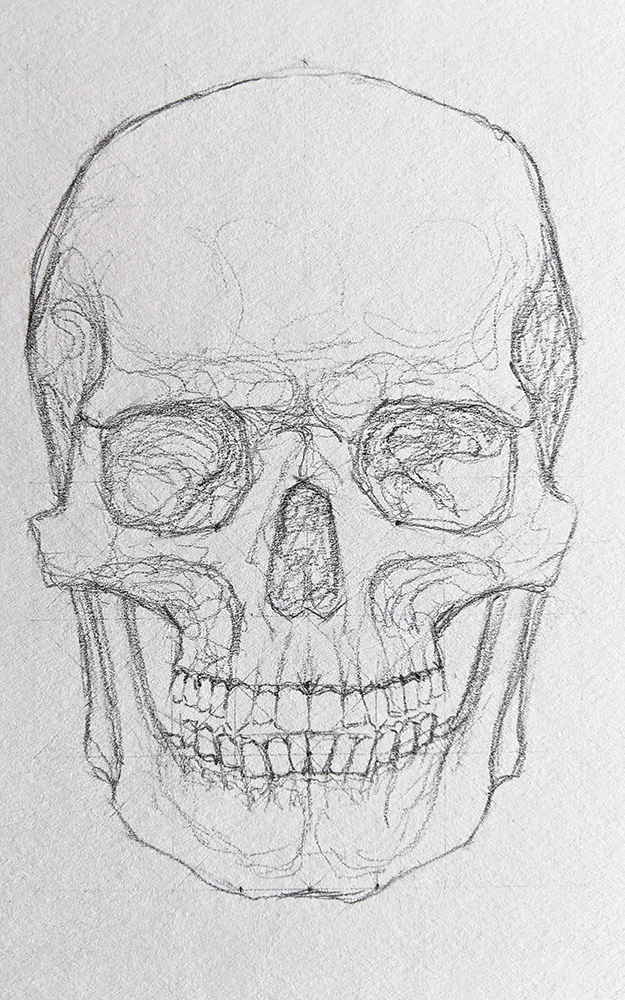
After placing these you'll have the basic shapes and forms in place for your skull. From this point on, finishing the drawing is a matter of rounding edges, adding details, and making the skull into an individual skull.
The lines we've placed so far, are much like a scaffolding or set of training wheels. It's now up to you to build on that framework to make it into your drawing of a human skull.
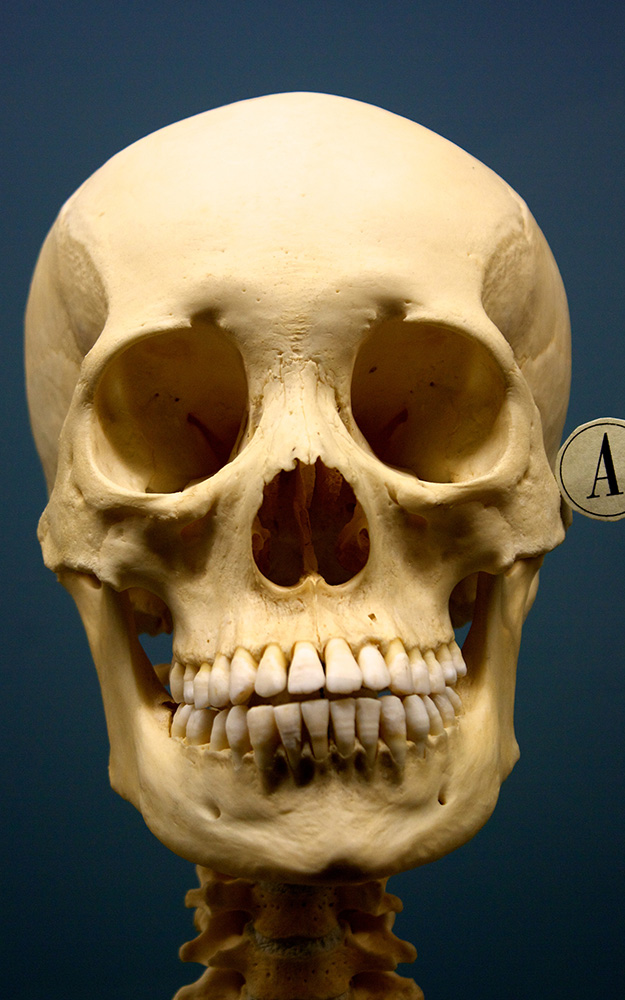
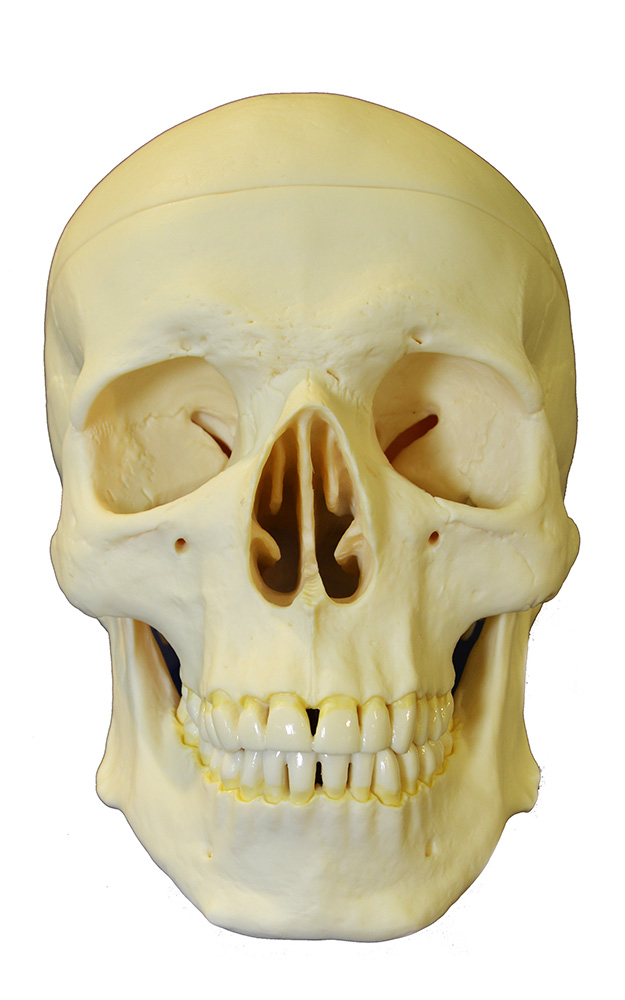
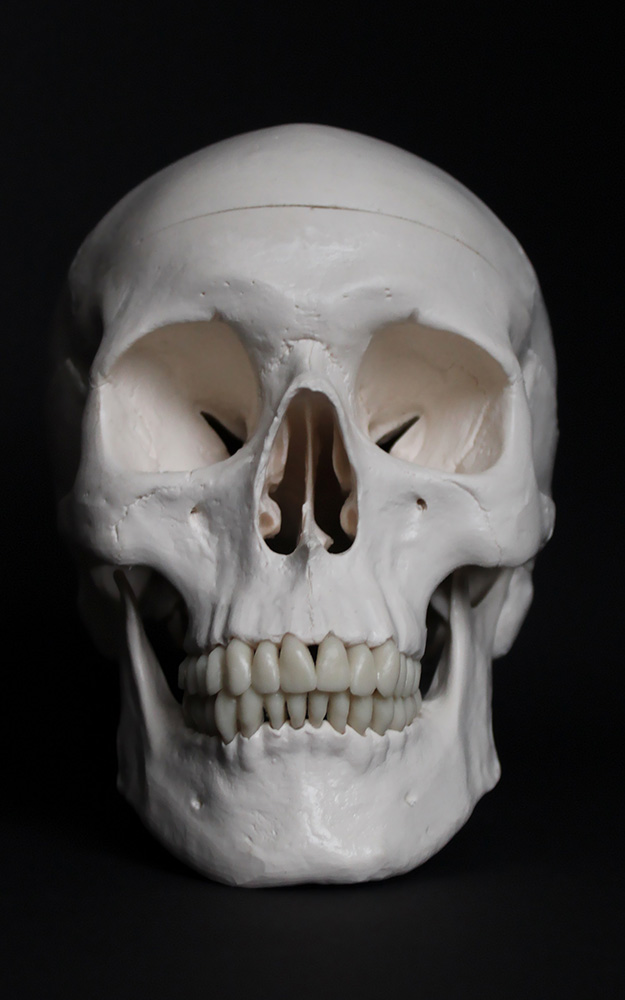
At this point I recommend referring to a reference image of a real human skull. When you start to look at multiple photographs of different skulls, a real learning moment will happen. You'll start to see how every actual skull looks different, but there are similarities between all of them. There is nothing wrong with picking and choosing parts of different reference images and adding them to your own drawing.
Sources for the images below: First, Second, Third.
Here is another collection of skull reference photos: Human skulls in anterior aspect
I've also collected additional skull images on a Pinterest Board.
From this point on, there is no order of steps needed. Using one or more reference photos, start rounding edges, connecting lines, and adding details to your drawing as you see fit. It's up to you to decide how detailed or not you want to make your drawing.
You should definitely look at a reference photograph to define the teeth for your skull drawing. The lines we've put in place already should help you to place them correctly. The teeth, in particular, will look very different from photograph to photograph.
This point is also a good point to erase the grid lines on your drawing, if you so choose. As you add detail and refine the drawing, it might become harder to erase the grid lines later.
That brings us to the end of this tutorial. Again, it's really up to you to decide when your own drawing is "done." No one can answer that but you. My advice is to call your drawing done when you get the sense that you've run out of things to add that will enhance the drawing.
Remember that this tutorial is designed in a way to be repeated multiple times. As you do a skull drawing with this method, you will realize can skip steps. Each time you repeat the drawing, knowledge of the form of the skull, its features and proportions, will sink further into your brain. Doing the drawing repeatedly is a great way to practice different techniques for rendering form.
Click here for a simplified guide to this drawing with anatomy labels.
** New ** Click here for a guide to drawing the skull from the side.
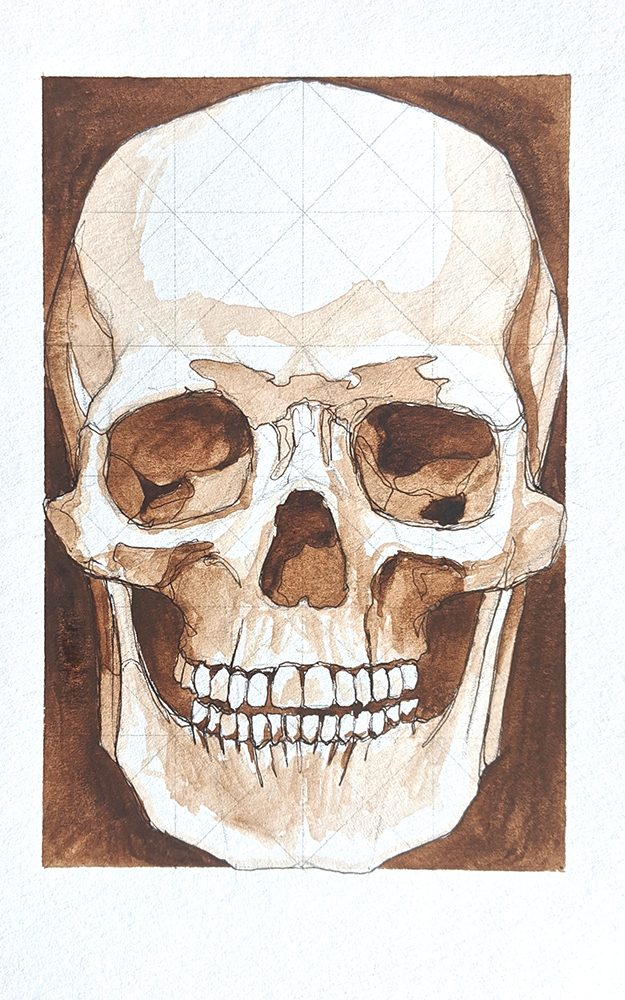
You should also experiment with different media. Use the grid and guide image to start a drawing, then use pen, ink, watercolor, gouache, or paint to complete your artwork.
The more you practice your drawing by going through these steps, the more an internalized sense of the correct proportions and forms of the skull will sink into your brain and help all your other drawing of people, heads, and faces.