Have you ever been in a life drawing class, or in front of something you want to draw, and with a limited amount of time to draw? Have you started your drawing only to get halfway through and realize that all parts of it are out of whack and everything is out of control? Have you ever jumped right into a drawing, and gotten something down, felt good, felt like you had something good going, only to realize that what you've drawn is too big, too small, or does not fit together with the rest of the drawing?
In my other tutorials, I describe the sight-size method and doing master copies. Both are modes of drawing and drawing practice that allow you to take your time. With those modes of drawing, you get the most out of them by taking your time. But what about situations where you don't have time? With time pressure, how do you keep your proportions in check and all the parts fitting together? How do you stay in command of your drawing?
When I was learning to draw, and working on improving my drawing, I bumped into this problem a lot. It affected me and affects many beginner artists. When faced with time pressure, you can become your own worst enemy. In a life drawing class, drawing the human figure is one of the hardest tasks in art. This is because there is so much information to capture from the figure. There are the basic shapes, the basic form, the arms, legs, head, likeness, anatomy, color, individuality, character, etc.
All of this information can be completely overwhelming. A typical beginner dives in and immediately begins to focus on one area, zooms in and tries to lay down detail and definition in one particular area. Soon, the beginner will realize that time is limited and will jump to another area, focus on it, and lay down more detail. The beginner will very likely not make sure these two areas are correct proportionally in relation to one another. If and when they do, it can be very frustrating to have to erase and re-work a section. Time is wasted. The drawing is now a mess.
What is the solution? How do we avoid this kind of pain and frustration?
The answer is to have a solid procedure and mental framework for going about doing your drawing. The difference between a beginner and a well-trained artist is very much determined by the method each goes through when executing a drawing. A well-trained artist has learned and internalized an effective method for going through the process of drawing.
This is where the comparative method of drawing or just comparative measurement comes in.
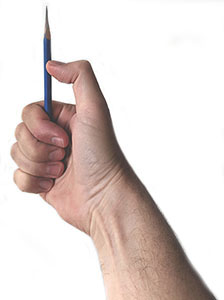
In its simplest form, the comparative method is just using something (usually your thumb and pencil) to measure lengths on your subject and compare them to each other. For example, extend your arm and hold your pencil perpendicular to your arm. Line up the tip of the pencil (for example) with the bottom of the subjects foot and use your thumb to mark the spot on your pencil where the subject's knee is.
Now, keep your arm outstretched and move your pencil (with thumb still in place) and compare this distance with other distances on the subject. For instance, the width of the torso, or the length of the arm or upper arm.
The magic happens when you do the same measurements and comparisons within your drawing.
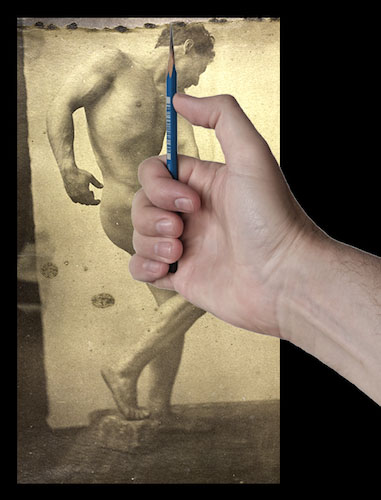
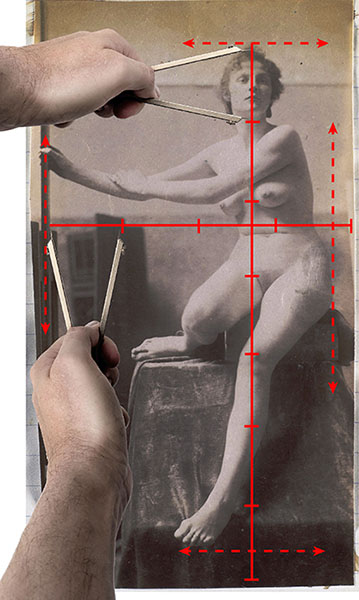
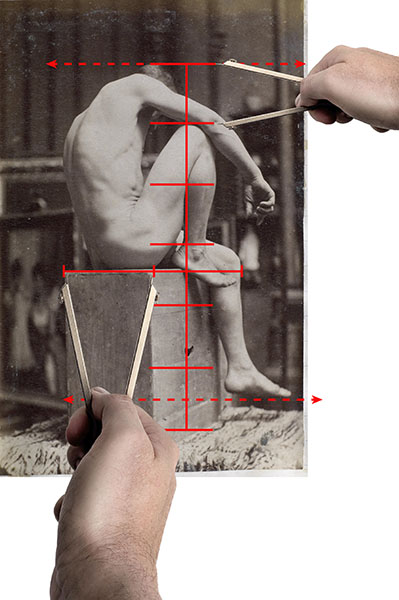
Another figure drawing example: to take a comparative measurement, hold your pencil vertically and with an outstretched arm. Line up the top or tip of the pencil with the top of the head of your model. Place your thumb at the point of the pencil where it corresponds to the end of the model's chin.
The distance between your thumb and the tip of the pencil serves as a unit of measurement. You can now move your arm down, with your thumb in place, and apply that unit of measurement to figure out how many head-lengths your model is.
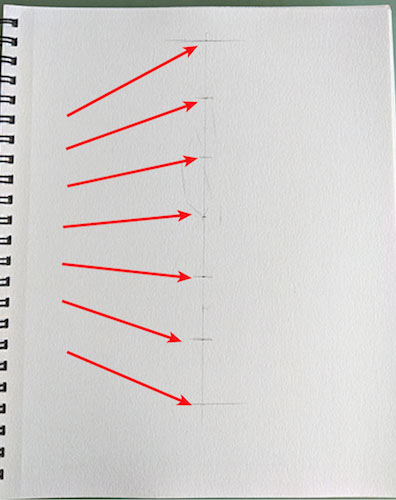
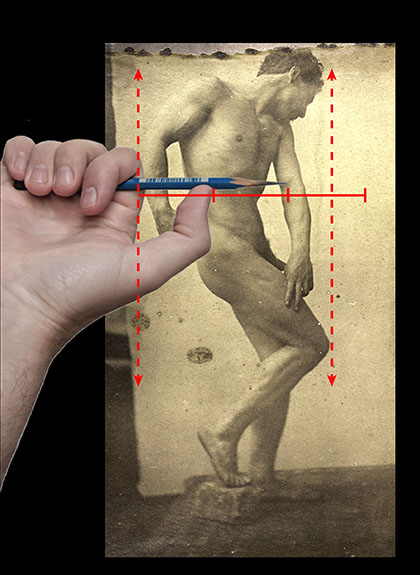
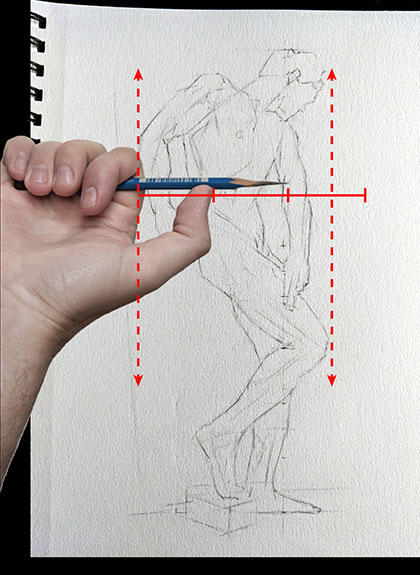
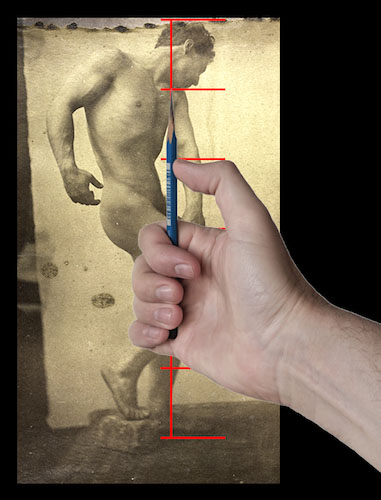
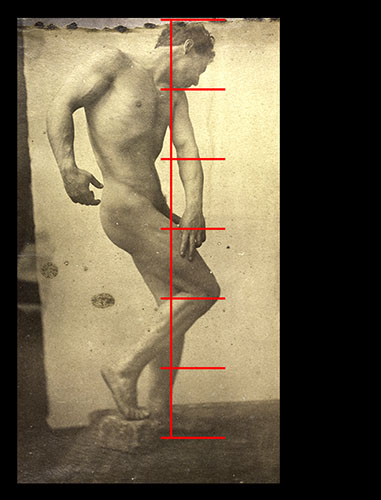
Once you've made a series of vertical measurements and compared your drawing with the same number of proportional units of visual distance, do the same thing horizontally.
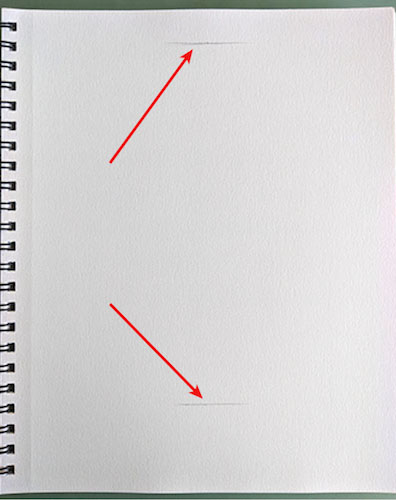
It's just as important to set the horizontal boundaries of your drawing as the vertical boundaries. Using comparative measurements to find these boundaries early on in the drawing process will help you keep your drawing and it's part contained.
The point of all of this is to help you get your proportions right. Keeping your proportions right is essential to accurate, realistic, and convincing drawing. There is no one right way to do this and it can be done in all kinds of ways. You can use a drafting divider, a chopstick, a knitting needle, a skewer, or anything straight for this purpose. The basic idea is just finding a way to fix a length of visual distance that you can use as a means of proportional comparison on your drawing.
The trick to the comparative method of drawing
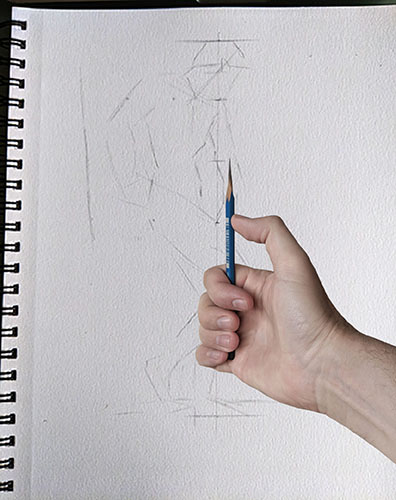
The real trick to using the comparative method is to know when is the best time to use it. You should be doing measurements and checking your proportions throughout the whole process of your drawing. However, the most important time is when you first get some basic and light lines down. Always begin with light, non-committal, and very general lines. Your initial lines will always have the highest likelihood of being wrong or off.
The sweet spot is when you’ve put down that initial set of basic lines. That is the best time to employ some comparative measurements and check the overall length and width of your drawing. Early on is the best time to set some horizontal and vertical boundary lines on your drawing to keep everything together. If you take your time in the early stages of your drawing to make sure that the proportions and distances in your drawing match your subject, you'll be on a solid footing to continue developing detail.
In summary, on one level the comparative method of drawing is a simple way to check your proportions during the process of drawing. On another level, comparative drawing is a means to stay in control of your drawing. It’s a way to keep your proportions in check and all the parts of your drawing working together. It also allows you to stay out of the trap of having to move or re-work sections of your drawing and thus avoiding frustration and wasted time.
Taking comparative measurements can be done quickly and easily with a pencil, divider, or anything straight. Because it is so simple to do, it can be done quickly and without much setup. This makes using comparative measurements ideal for time-limited drawing situations like life drawing sessions, portrait drawing sessions, or any situation where you want to work quickly.
Getting into the habit of doing comparative measurements in the early stages of your drawing will avoid rework and frustration and set you up for success and satisfaction with your drawing.